If the FODMAP diet isn't working the way you’d hoped to control IBS symptoms, don't beat yourself up. There are 3 key areas to check in on in order to get YOUR best results from the FODMAP Diet.
If you're just starting out on the FODMAP Diet and feeling lost or overwhelmed, this is dedicated to YOU as you search for help starting FODMAP.

Pssst! Follow me into this dark alley…
Just kidding. I’m not going to whisper wacky conspiracy theories in your ear. But I do need to shed light on a few things about FODMAP - the gray areas that don’t get talked about much.
I’m here to make sure you don’t lose sleep stressing over things that don’t matter AND that you stay focused on the positive. (You’re NOT settling for a flavorless life of deprivation!)
Click below to watch the video or keep reading!
If a food hasn’t been tested for FODMAP content, make an educated guess - a quick google will give you an idea of what you’re dealing with. If it’s not related to another high-FODMAP food (say it’s an exotic cousin of peaches for example), or it’s buried far down in a long ingredient list, it’s unlikely to throw you off your game.
Don’t wait for the perfect time to start the Elimination Phase. If you can’t resist empanadas on your trip to Miami, it’s all good. Get back to FODMAP as soon as you can. The goal is consistent improvement for your belly, not obsessing over every bite.
Big meals, too many processed foods, eating when stressed (or stressing about eating), hormone fluctuations, sleep, exercise, high-fat food, salty food...all of it affects how flat or calm your belly feels on any given day. This is true even for people who DON’T have IBS. Don’t let it drive you crazy. Just know that the slice of onion you accidentally ate for lunch might not be solely to blame for your bloat.
You decide to treat yourself to a curry and naan at the Indian restaurant even though you’ll probably feel gassy afterwards. So you nosh your naan and feel totally peachy the next day. What the heck?! Maybe it’s because you weren’t stressed about the meal; maybe you ate smaller portions than you would have in the past. Like I said in #3, your gut is a complicated piece of work. The best way to duplicate these good belly days? Track what you eat, and jot down other health factors (i.e. stress level) too.
FODMAP is a temporary “learning diet.” As in learn what foods are better or worse for maintaining that flat-belly feeling. Then go forth and embrace life’s deliciousness (with a few modifications).
Now that you're FODMAP-savvy, it's time to take AWAY those pesky high-FODMAP foods.
Since the easiest way to do this is to focus on what you CAN eat, I created a handy shopping list, complete with links to some of my most-mouthwatering recipes.


Last week, I busted myths about reintroducing FODMAPs, and now it's time go deeper on this topic.
The only way to find out what foods trigger your IBS is careful reintroduction. But how do you REALLY know you're ready?
It’s essential to figure this out so you’ll know when to take the leap.
The most important sign you're ready to reintroduce FODMAPs is that you've experienced consistent improvement in your symptoms by doing the elimination phase.
But sometimes you need a little more info to go on! So I came up with 5 signs that show it's time to test FODMAPs.
Eating croissants in Paris when I was there celebrating my 10-year anniversary in May made one thing crystal clear about reintroducing FODMAPs, and it’s why I’m writing this post:
Knowing what foods trigger your IBS and which ones don't makes life so much more delicious.
Your belly feels good, but you’re not happy (spending 8 months in the elimination phase has officially sucked the joy out of your life).
You’re mad at yourself for spending a small fortune on low-FODMAP crackers and bars again because you suspect that a little bit of wheat (or milk/honey/onion powder) will NOT actually turn your belly into an angry, raging fire.
You went to a new restaurant with a really creative menu and spent $24 on a plain grilled chicken salad (special request, of course).
You just booked a week in Mexico and feel stuck between A) Totally depriving yourself on the elimination phase, and B) Eating ALL THE THINGS and getting diarrhea at the beach.
You really miss fresh figs or [insert food of YOUR dreams here].
If these signs sound oddly specific, that’s because I experienced them all myself. The biggest thing I found? Traveling and eating low-FODMAP can be excruciatingly hard, especially if you're a foodie.
Luckily, I’ve got something that will help you put pizza and pad thai and tapas back on your radar, not banished for all time.
Trying to piece together your own reintroduction plan feels like swinging at a piñata blindfolded-- you're just stumbling around in the dark.
Different websites have different rules...Which ones are actually important?
If you want to do this phase at your own pace and a done-for-you plan to find your IBS triggers, Free To Eat is the solution you've been looking for.
Our Free To Eat program, plus monthly trainings, Q&A calls, and community support are available to all members of Calm Belly Club. Join today for only $12.99 per month, cancel anytime.
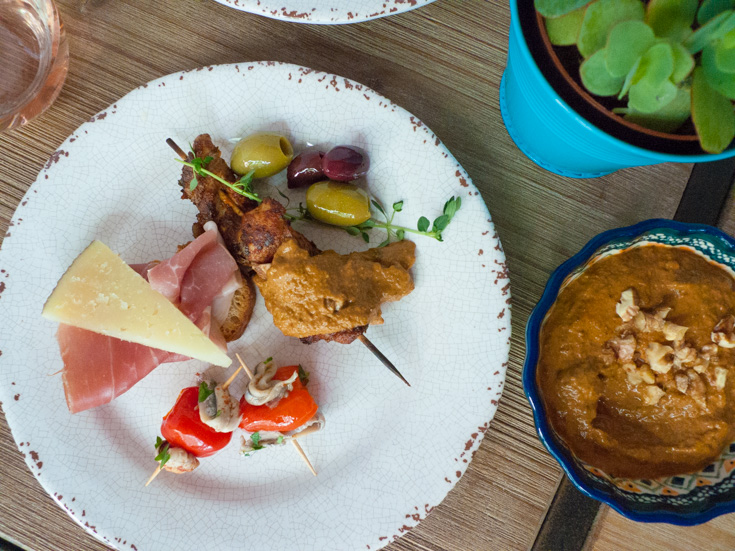
Whenever a vacation is coming up and I’m looking for good restaurants to try, I will always scout out the best tapas bars. I don’t care if we’re hitting up Boston, Madrid or Wilmington, North Carolina. If I’m going to be eating out, any restaurant with a great meat and cheese plate is my #1 choice.
That’s exactly how it was on my last trip...People like to say London isn’t a great foodie destination, but that must be because they’re eating actual English food in England. I can point you to a very tasty tapas place, as well as a legit pintxos bar just off the beaten path. I ate at both of them twice. In 7 days.
It’s very do-able to go out for tapas and keep the FODMAPs in check (the aforementioned charcuterie plate is great way to go). However. I passionately believe that eating is one of the best things we get to do as humans, and every meal should be a tiny celebration of that.
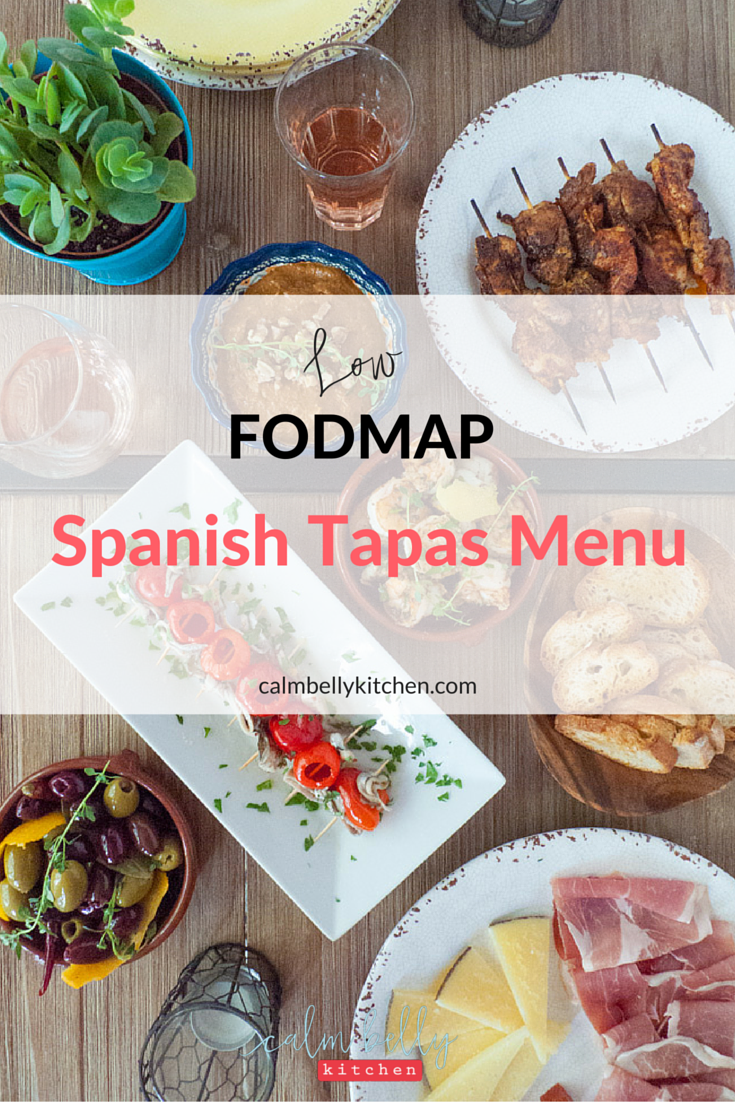
So let’s bring the tapas directly to your kitchen where you get to choose the ingredients and keep those FODMAPs low, low, low. This menu is what life can look like on the FODMAP diet--even in the elimination and reintroduction phases.
Forget the notion that low-FODMAP cooking equals a depressing plate of steamed rice, plain grilled chicken and 12 green beans. When you do the FODMAP diet, there’s a very good chance you’ll have to change the way you cook and eat. But it doesn’t need to be a change for the worse!
This is at the core of how I coach clients through the FODMAP diet>>>No giving up great meals OR missing out on the soul-nourishing social aspects of eating.
This menu would please even the most jaded judge on Top Chef (okay, maybe not Padma; is she ever in a good mood?), but more importantly YOU won’t feel deprived even though there isn’t a garlic clove in sight.
The best part about tapas is that you don’t have to cook every last thing. I’ve got 4 simple recipes (plus sourdough toasts), AND 2 no-cook tapas to fill out your menu.
Are you a tapas junkie like me, or is this type of meal new to you? Either way, invite some friends over to try out these recipes--they will never think you’re on a restricted diet.

This classic dish is on nearly every tapas menu, and all it takes is some lovely garlic-infused oil! And since most restaurants don’t bother adding finely grated, fresh lemon zest, yours might just be superior.
Serves 4 to 6
1 large lemon, rinsed well and dried
1 lb medium shrimp, peeled and deveined
Salt and freshly ground black pepper to taste
1 tbsp olive oil or cooking spray
2 tsp garlic-infused oil
1 tbsp chopped fresh parsley
Thyme sprigs for garnish
1. With a vegetable peeler, peel off one (3-inch) strip of the skin (the “zest”) and reserve for garnish. Zest the rest of the lemon with a microplane grater and set aside. Squeeze about 2 tbsp juice from the lemon and set aside.
2. Pat the shrimp dry with paper towels and season with salt and pepper. Heat the oil in a large skillet on medium-high, or mist skillet with cooking spray.
3. Add shrimp and cook without moving until bottom sides are golden brown, 2 to 3 minutes (Cook shrimp in 2 batches if necessary to avoid crowding the pan and get better browning). Turn and repeat on opposite side until shrimp are opaque in the thickest part, 2 to 3 minutes more. Transfer to a large bowl.
4. To the bowl, add garlic oil, parsley, lemon zest, and lemon juice; stir gently to combine. Transfer to a serving bowl, garnish with lemon strip and thyme, and enjoy.

These look so pretty on the table--like you paid too much for them at a fancy deli. I’m giving you two options here, depending on the time you want to spend. Both work, but you will get more flavor with the heat method.
Serves 4 to 6
1 naval orange
1 cup extra virgin olive oil
3 small dried red chiles
2 dried bay leaves
4 sprigs fresh thyme, plus additional for garnish
⅔ cup large green olives, pitted
⅔ cup kalamata olives, pitted
1. With a vegetable peeler, peel the skin (the “zest”) off the orange in 3 to 4-inch strips. Juice the orange until you have about 2 tbsp juice. Refrigerate juice until step 3.
2. Shortcut method: To a shallow bowl or baking dish, add the orange zest strips and remaining ingredients. Cover and refrigerate overnight (it’s okay if you only have a few hours to do this, but longer is better).
Heat method: Add 1 cup oil to a medium saucepan and heat on medium-low. When oil is shimmering and viscous (do not let it get steamy or start smoking; lower the heat if needed), add the orange zest strips, dried chiles, bay leaves, and 4 thyme sprigs. Reduce heat to low and wait 2 minutes. Remove from heat. Set aside until cool.
Add olives to a shallow bowl or baking dish and add the oil mixture. Cover and marinate at room temp for up to 1 hour or refrigerate overnight.
3. Whatever method you used, bring olives to room temp if chilled. With a slotted spoon transfer to a serving bowl; add a few tablespoons of the oil to bowl, but not all of it. Add reserved 2 tbsp orange juice and stir gently to combine. Garnish with additional fresh thyme and serve.
NOTE: You can use the remaining oil marinade for dipping, or anywhere you would use olive oil. It will keep in the refrigerator (do not leave at room temp or bacteria can grow) up to 1 week.
This thick sauce, build around roasted vegetables and nuts, usually includes garlic, as well as stale bread as a thickener. My version is lighter and brighter thanks to plenty of veg, which means more room for Manchego.
Serves 4 to 6 (makes about 1 ½ cups)
1 dried ancho chile pepper or 1 ½ tsp ancho chile powder
⅓ cup (generous) walnuts (about 45 grams)
Cooking spray
1 red bell pepper, seeded and cut into 3 to 4 pieces
2 medium tomatoes, halved
5 scallion tops
2 tbsp extra-virgin olive oil
1 tbsp garlic oil
1 tbsp red wine vinegar
Salt and freshly ground black pepper to taste
1. If using dried ancho chile, place in a small bowl and cover with boiling water. Soak 15 minutes or until soft. Pat dry with paper towels. Cut open the chile and remove the stem and as many seeds as you like (anchos aren’t very spicy). Set aside.
2. Preheat oven to 325F. Spread walnuts on a baking sheet and bake until fragrant and lightly toasted, 8 to 10 minutes, tossing nuts around the baking sheet about halfway through. Set aside and cool completely (maybe done up to several days ahead). When cool, roughly chop walnuts and reserve 1 tbsp for garnish.
3. Raise oven temp to 425F. Line a large rimmed baking sheet with foil (optional, to minimize clean up) and mist with cooking spray. Add bell pepper, tomatoes and scallions; mist with cooking spray and season with salt and pepper. Roast each veggie until browned and very tender, removing from oven as needed: about 12 minutes for the scallions; about 32 minutes for the tomatoes; about 38 minutes for the peppers. When peppers are cool enough to handle, peel off the skin and discard.
4. To the bowl of a food processor, add all but 1 tbsp walnuts and pulse until roughly chopped. Add the ancho chile if using, the roasted veggies, and the remaining ingredients (if using chile powder add it now). Blitz until you have a slightly chunky puree. Romesco sauce should be thick but easy to dollop off a spoon (not quite as thick as hummus). Add water, 1 tablespoon at a time, to thin as needed (I used 2 to 3 tbsp).
5. Transfer sauce to a serving bowl and garnish with reserved walnuts. Serve with chicken skewers. May be made up to 1 day ahead and refrigerated. Serve at room temp.
Smoked paprika is a major flavor in Spanish cooking, and it doesn’t resemble the common red stuff you’re probably familiar with. It’s incredibly smoky, earthy, and almost pungent (and it’s readily available in most supermarkets). Soaking the skewers is an extra safety measure to keep them from catching fire.
Serves 4 to 6
12 small bamboo/wooden skewers (6-inch), soaked in water for at least 30 minutes
6 boneless, skinless chicken thighs (about 1 ⅓ lbs)
1 tbsp smoked paprika
2 tsp cumin
1 tsp dried oregano
Salt and freshly ground black pepper to taste
Cooking spray
1. Cut each chicken thigh into 4 strips, trimming off any large bits of excess fat as you go. Thread chicken onto skewers, using 2 strips per skewer. In a small bowl, combine paprika, cumin, oregano and salt and pepper.
2. Preheat broiler to high and position rack in upper third of oven. Alternatively, you can cook the chicken on an outdoor grill. Coat a large, rimmed baking sheet or broiler pan with foil and mist with cooking spray. Place chicken skewers on the baking sheet and coat both sides with cooking spray. Sprinkle spice blend all over chicken and use your hands to rub into the meat.
3. Broil or grill until chicken is opaque in the thickest part, 3 to 4 minutes per side. Transfer to a serving dish and serve with Romesco sauce.
Traditionally made, slow-rise sourdough is low-FODMAP (the sugars are consumed by yeast during the fermentation process)! If prefer, gluten-free bread or crackers, those would be fabulous too. Baking the toasts until they are completely crisp allows you to make them ahead of time if needed.
1 sourdough baguette, sliced
Olive oil cooking spray
Preheat oven to 375F. Coat a large, rimmed baking sheet with foil and mist with cooking spray. Add bread in a single layer and mist both sides with cooking spray. Bake until deep golden brown on both sides, and very crisp, 12 to 14 minutes, turning about halfway through. Serve immediately or cool and store in an airtight container up to 6 hours (toasts will stay crisp like crackers).
Fill out your menu with these delicious options--just shop and assemble!
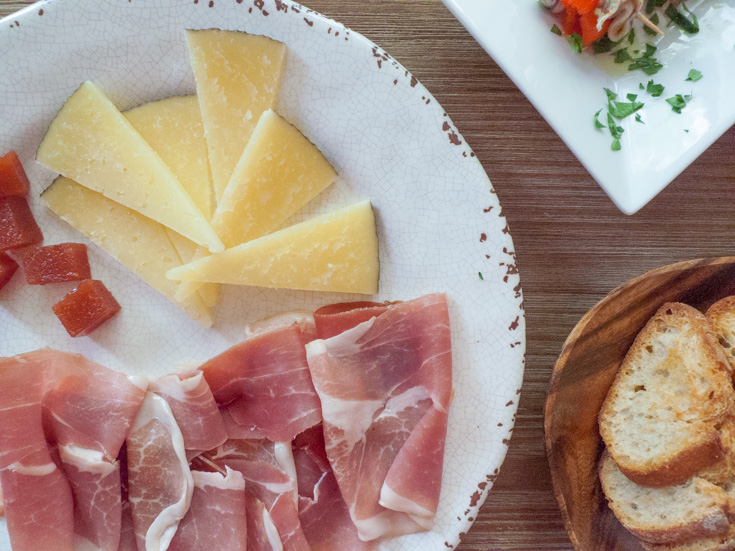
The classic options are Manchego (an aged sheep’s milk cheese) and jamon serrano. When I went shopping, there was no serrano, so what you see in the picture is actually speck, or smoked prosciutto. Regular prosciutto is great too. If you’re feeling very fancy, you can splurge on jamon iberico.
The pink jelly squares are quince paste, a classic accompaniment, which has actually been tested for FODMAP content by Monash (½ tbsp or 13 grams is green light, and 1 tbsp is yellow)! It’s very sweet, like jam, so you only need a little to pair with the meat and cheese for amazing salty/sweet contrast.

The little fish on toothpicks are Spanish-style marinated anchovies, or boquerones. These are amazing, and taste nothing like the super-salty anchovies typically used for Caesar salad. They can be hard to find (I got them at Whole Foods), but Spanish-style tuna would be the perfect alternative (pretty much any canned or processed seafood from Spain is insanely good). If the tuna isn’t firm enough to stay on the toothpicks, stuff it inside the peppers.
The little red peppers are piquillos, which are both sweet and a little spicy. If you can’t find them (try Trader Joe’s or the olive bar at a nice supermarket), substitute roasted red bell peppers. To serve, I drizzled garlic oil over the boquerones skewers and sprinkled on some parsley.
Whether it’s a decadent dessert, sweet breakfast, or romantic dinner, we’ve got you covered with 21 low FODMAP recipes perfect for your Valentine’s Day.
These low FODMAP blueberry muffins make the perfect grab-and-go breakfast or snack to calm a craving, complete with streusel topping!
Thought a low FODMAP Buddha Bowl was impossible? Not so! This IBS-friendly recipe is hearty, colorful, and packed with nutrients...and you'll love the sticky sesame sauce. Time to hop on the trend with this sesame chicken Buddha Bowl!
This low FODMAP pasta salad will be your new go-to recipe. It can be made ahead, plus it's fresh, summery, and perfect for get-togethers.

I love busting myths about the FODMAP Diet because knowledge is power! In last week's post, I explained why "less FODMAPs = less symptoms" isn't the full story.
The end goal isn't to restrict all high-FODMAP foods forever - It's finding your unique IBS triggers so you can bring back foods that don't cause your stomach issues.
Whenever I talk about finding IBS triggers with friends or the CBK Facebook community, I see lots of hesitation around bringing FODMAP foods back into your diet.
I get it! It's nerve-wracking to start eating foods that might make you feel bad again, and the whole thing can seem overwhelming and complicated. But that's because you've heard myths that are based in 100% fear and 0% fact - and that's just plain destructive!
So let's bust these myths that are holding you back from seeing how capable you are of getting control your IBS triggers and confidently enjoying food again!

This myth is false because I read emails and Facebook posts like this everyday:
"I'm struggling with everything about this diet."
"I hate missing out on all the foods I love."
"I'm tired of eating the same four things."
I understand how comforting it is when avoiding all FODMAPs 24/7 brings relief, but there's no need to eliminate so many foods forever. You can have the same freedom from symptoms AND so much more freedom in what you eat.
When they reintroduce high-FODMAP foods, my Free To Eat members love discovering the old favorites they can eat and remain symptom free.
Personally, I learned that having wheat occasionally doesn't have negative effects. I'm absolutely thrilled that I can whip up my favorite pizza and enjoy every bite!
And even if you do learn that garlic triggers your symptoms in larger servings, you might learn that a small amount is just fine. It makes it a lot easier to eat out when you're not worried about every possible smidgen!
You don't have to cancel your social or travel plans to reintroduce FODMAPs. If you go out to dinner every Wednesday with your girlfriends, you don't have to stand them up. If you go to your cousin's birthday party you don't have to awkwardly avoid food all night.
It's possible to fit the FODMAP testing around YOUR calendar. Don't let the urge to be perfect keep you from ever getting started. It's so easy to fall into this trap. I know because I did it too.
In order to finally get going with the reintroduction process, I had to accept that there was no "perfect" time to do it. But once I actually started, it was easier to fit into my life than I imagined. I could take a break from testing if I needed to, and I didn't have to cancel any vacations or birthday dinners.
Not even close! That would intimidate even the biggest foodie! Instead, we strategically test every FODMAP category:
Fructose (monosaccharides)
Oligos (you'll do 5 tests within that group)
Lactose (disaccharides)
Polyols (you'll test 2 individual polyols).
If you dig the science-y aspect of FODMAPs and can't wait to get started, great!
And if all that lingo makes your head swim, you're still in the right place. All this means is that there's a strategic, easy to follow method that's designed to get you answers without complicating your life or sending you down a google rabbit hole.
How do you test strategically? By testing foods that contain only 1 type of FODMAP. Since apples contain both fructose and polyols, they wouldn't be a good test food - It would be impossible to tell which FODMAP in that apple is responsible for your symptoms.
Once you've learned which FODMAP categories are triggers for your body, you'll be able to determine your tolerance for other foods in those categories. If you choose, you can continue doing individualized experiments to your heart's content (more on that in #5).
Here's how it works: You test a FODMAP group and learn how well you tolerate it. But what if your results aren't so black and white?
What if 1 Tbsp of a food gives you some mild symptoms, but when you test 2 Tbsp you strangely have no symptoms at all? What the heck!?
Is your body highly predictable, always reacting the same way all the time? For the majority of us, the answer is no.
Yes, it's frustrating, but the trick is to treat every test as an experiment that gives you more and more info to work with.
So what do you do next? You have a lot of options because the testing process is flexible and adaptable.
You can do the test again. You can wait and repeat it later. You can use a different test food. The important thing is to be patient with your body and not give up.
Your first try doesn't have to be a perfect slam dunk to be useful. Gathering more data over time WILL help you see the important patterns for your symptoms.
The fact is, your diet can change as much as you want it to. When testing is done and you feel satisfied with the data you've collected, the real fun begins.
You take what you learned and use it to design a personalized eating style that puts you 100% in control of your symptoms, now and for the future!
You have no more mystery symptoms, no more anxiously flipping back through your day and wondering what caused your discomfort. You can have a calm belly, and eat your perfect mix of high and low FODMAP foods that keeps your IBS in check.
And let's be real: This isn't about eating perfectly, it's about having the knowledge to make the right choices for you. Even if you're certain it will give you symptoms, you can choose to eat ice cream when you really want it! If some symptoms is worth the joy of ice cream, you get to choose that.
Either way, you have less anxiety and are finally in control of your symptoms.
Can I get a YES! FINALLY!!!
See, those myths aren't so scary once they've been busted. And they definitely don't have to hold you back!
If you've read tips on replacing onion and garlic before, rest-assured that I'm not here to repeat the conventional wisdom. For example, I won't tell you to just use scallion tops for everything, or rush out and buy asafoetida, the pungent Indian spice.
There's nothing wrong with the usual cooking advice aimed at FODMAPers, I just don't think it tells the whole story. There are other ways to cook incredibly flavorful food besides replacements that don't quite measure up to the real thing.
And when it comes to asafoetida as a substitute for onion flavor, I'll bust that myth right now:
Skip it. It's not worth it.
Years before I learned about the FODMAP diet, I had a jar of asafoetida that I played with alongside all my other traditional Indian spices. (Remember, I'm a foodie who used to do recipe development for a living.)
Always used together with other spices, and at only 1/4 tsp for a recipe that serves 4, it mingles with the other ingredients to add a savory background funk.
But add a little too much to your spaghetti sauce for example, and suddenly your lovely sauce stinks like over-cooked cabbage. Unless you're cooking traditional Indian food, I say leave it on the shelf.
So where does that leave us? Actually, it leaves us smack in the middle of a flavor tornado. In other words, you have a LOT of options to boost the flavor of just about any recipe. I'll still tell you my best strategies for replacing onion and garlic, but I'll also explain how to build flavor in other ways.
It's scary, I totally get. I was devastated to think that I couldn't cook with onion and garlic when I first learned about the FODMAP diet. We are taught to believe that these ingredients are our saviors from bland, flavorless food. But I swear on my pug's fuzzy head that giving them up is not a big deal.
And know this: Many people, including me and the clients I've worked with, learn that they can eat garlic, onion or both in moderation after testing them in the reintroduction phase of the FODMAP diet. That's why it's crucial to go through the testing process.
>>> Just getting started? Click here to download your FREE Shopping List complete with links to some of my favorite low-FODMAP recipes!

Let's start with this pesky little minx. There's nothing else that tastes quite like garlic, and that's why garlic-infused oil is so fabulous. FODMAPs are water soluble, but not fat soluble. So when garlic cloves are cooked in olive oil on low heat, the flavor transfers over, but the FODMAPs don't.
Here's the trick for maximum flavor:
Use garlic oil at the very end of the cooking process, or as a finishing oil at the table. If you use it to sautee or roast, the high heat can damage the oil, diminishing the flavor. But drizzle it on that spaghetti bolognese right before you dig in, and you've got an instant garlic infusion!
Clearly it's not the same thing, but since it measures about the same and is often used together with garlic (think Asian and Indian dishes), it can give a lot of recipes that sharp, aromatic boost.
Pesto is a perfect example, and I made a version for the CBK cookbook where I essentially swapped ginger for the garlic. It won't fool anyone, but that's not the point--the pesto tastes great.
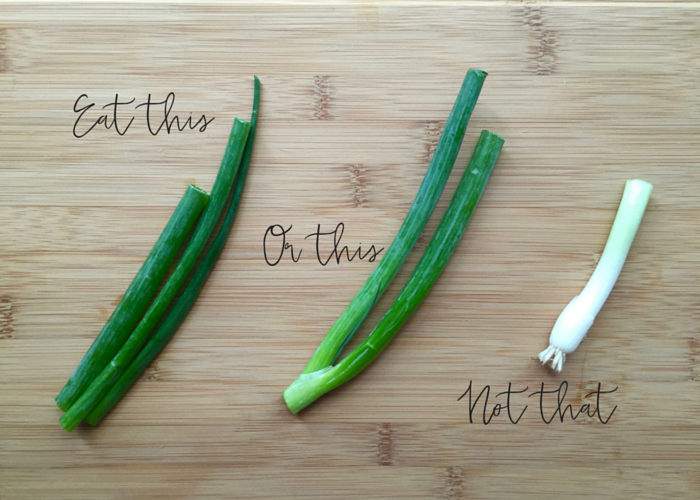
1) Leek Tops: They take some effort to clean (more on that in a second). However. They're absolutely delicious and a better onion sub than scallions, especially when you need to add them at the beginning of the cooking process. They have a slightly sweeter, slightly more herbaceous flavor than onions.
Like scallions, the white part has high FODMAP content, but the green part is low. You'll want to trim off a few inches of the green part because they're tougher at the top. I personally eat a little of the light green part, but everyone should decide how much to eat based on personal sensitivity.
Leeks are grown in the ground and dirt gets trapped inside all those layers. I have an easy system for washing them, so I made a video showing you exactly how to do it. I also show you what part of the leek to eat!
2) Scallion Tops: Yes, they're great, but the flavor doesn't really come through unless you add them raw at the end of cooking, or as a garnish. Just like leeks, you'll want to eat the dark and possibility some of the light green part. Here's what I mean:
Since it's difficult to make up the volume of an onion with scallions, I recommend using leeks if your recipe calls for 1 cup of onion or more. Or you could get a little more creative...
3) Grated Carrots and Parsnips: Whether you use them together or separately, these veggies are perfect when recipes call for a LOT of onions, especially soups and stews. Grate them in a food processor and saute them until lightly browned, just like onions.
4) Thinly Sliced Cabbage: Stir-fried or sauteed cabbage is sweet and delicious. Cook it in a hot skillet for about 10 minutes, and you can add it to soups, braises or casseroles in place of the onion.
5) Nutritional Yeast: Weird but effective! This form of deactivated yeast has a cheesy, nutty quality that vegans love as a replacement for cheese. To my tastebuds, it's just plain savory, and slightly funky in a good way.
Because the texture is similar to a ground spice, I like adding it to creamy dressings, sauces, and soups. When I use it to make low-FODMAP ranch dressing (with lactose-free yogurt, lemon juice, chives, and scallions) it adds an extra layer of flavor that you might mistake for onion powder.
6) The Trinity, FODMAP-Style: In Cajun and Creole cooking, the trinity is onion, celery and bell pepper. In French cooking, it's called mirepoix and consists of onion, carrot and celery. These combinations of ingredients are used as a flavor base in countless recipes.
My FODMAP version can be used to replace the trinity in any recipe, but you can also use it to replace the typical onion/garlic base. Here it is:
1 part chopped leek
1 part finely chopped or grated carrot
1/2 part chopped celery
Celery is moderately high in mannitol. But if you use 1/2 cup chopped celery in a recipe serving at least 4, your serving size will be in the low-FODMAP range. If celery is a problem food for you, replace it with red bell pepper or fennel. The FODMAP Trinity is flexible! And of course, you may find that mannitol is not a trigger at all when you do the reintroduction process.
If you want the food you cook to be crave-worthy and lip-smackingly delicious, umami is your ticket. This goes for any type of cooking, whether you have a dozen different dietary restrictions or you can eat anything you like.
Umami is the fifth taste (along with sweet, salty, sour, and bitter), but it's the one to rule them all. It's an almost-addictive savory flavor that occurs naturally in foods that are slow-cooked, caramelized, aged, or fermented, but also in cherry tomatoes, sweet corn, and mushrooms.
The flavor comes from glutamate, an amino acid, which usually requires some form of cooking or aging to release it. Adding umami-rich foods or enhancing umami with your cooking techniques will build that savory flavor whether or not you use onion and garlic in your recipe.
Parmesan and other aged cheeses
Truffle-infused oil
Miso paste
Soy sauce and tamari
Oil-packed anchovies
Fish sauce
Oyster sauce
Cherry tomatoes
Sun-dried tomatoes
Oven-roasted tomatoes
Ketchup (This brand is low-FODMAP!)
Cured meat (prosciutto, serrano ham, speck)
A good stock made with caramelized and slow cooked meat and vegetables
Dashi, the Japanese stock made from kombu (dried kelp)
Seaweed
For some of these flavor-bombs, you'll want to stick to the low-FODMAP serving sizes as listed on the Monash App. For example a low-FODMAP serving of sun-dried tomatoes is 8 grams (or about 2 halves), but that is plenty if you chop it up and add it to a salad, quinoa bowl, or pasta.
Glutamate naturally found in foods is different from MSG, the processed flavor additive that causes allergy-like reactions in some people. Keep in mind that glutamate is an amino acid, one of the building blocks of protein. In other words, healthy stuff! While some food makers might add MSG to soy sauce or other condiments, you can easily find MSG-free versions of everything on this list.

Raw meat and shellfish is full of glutamate, but you need to cook it to release the umami flavor. The same goes for many vegetables. Here's how to make the most of it:
1) Roast It - Roasting is amazing because not only does it let you cook, say a pork shoulder, simply and efficiently, it takes long enough to release those amino acids and slowly brown the meat.
The same goes for veggies: Roasted zucchini is about 100 times tastier than steamed, right? It's the caramelization. To make beautiful, deep-golden veggies, be sure to dry them well after washing--excess water will prevent browning.
Pro Tip: The type of cookware you use matters too. Choose dark-colored baking sheet and roasting pans. They absorb more heat, encouraging browning.
2) Caramelize It - Roasting isn't the only way to create caramelization. Instead of sauteeing veggies on high heat until just tender, take a few extra minutes and turn the heat to medium.
Use a cast iron or stainless steel pan (nonstick pans don't caramelize well because food needs to stick a bit to build that color and flavor) and add a thin layer of oil. Cooking veggies this way allows them to brown slowly and releases the natural sugars and umami.
3) Don't move it or crowd it - This is the golden rule when you're cooking protein in a skillet. If you want it to brown, don't crowd the pan, even it means cooking your food in two batches. Crowding produces steam, which is the enemy of browning. Resist the urge to push and stir foods like shrimp and scallops. Let them cook until the bottom side is deep golden, then flip and repeat.
4) Braise It - This applies to stocks and stews. The goal of braising is to partially cover your protein with liquid and slowly cook it so the flavor can build before the texture becomes tough or chewy.
Pro Tip: Never let the braising liquid come to a boil--this will cook the meat too fast. Fuss over your braise and adjust the heat until the liquid maintains a slow to moderate simmer. That means a few bubbles every 1 to 2 seconds.
1) It is so do-able to leave yourself and anyone else drooling over your low-FODMAP meals with onion and garlic nowhere in sight.
2) You probably don't need to permanently eliminate onion and garlic from your life. It's crucial to test both of these foods (members of the Oligosaccharide group, the "O" in FODMAP) by doing the reintroduction process.
If you want to explore more about starting the FODMAP Diet, there's a post for that: What are FODMAPs? The Complete Non-Techy Guide
This low FODMAP taco seasoning adds deep, smoky flavor to the healthy ground turkey. If you crave a new twist on your favorite low FODMAP tacos, try Taco Grits.

As I've been putting the finishing touches on the Calm Belly Kitchen Cookbook and getting it ready to release to the world (including all you wonderful people who have already pre-ordered), I've revisited recipes that I created as far back as January.
This has been a lot of fun, and I've even cooked some of my favorites in the last week just for the heck of it. Since all I've done lately is live and breathe (and probably memorized) these recipes, I want to share the absolute best and/or coolest tips and tricks from the cookbook.
I'm not gonna lie: Cooking is tough. It takes effort and planning, but there are so many shortcuts, hacks, and time-savers that can make it more manageable.
Here are the 7 coolest FODMAP cooking tips from my book, illustrated with photos straight from the pages. If you want to see even more, click here for my Cheesy One-Pan Mexican Rice recipe and head over here to see more inside pages, read recipe tester reviews, and order it yourself!


1. For a fuss-free salad on the go, choose kale over lettuce.
Lettuce gets sad and wilted, and you have to pack the dressing separately unless you want a soggy mess. Even if you dutifully carry along your little jar of dressing, you're always worried that's going to leak. Been there, done that.
For a salad that's a lot less high-maintenance, swap that lettuce for kale. Because it's a heartier green, you can add the dressing in the morning or even the night before.
It's actually better to prep your kale salad ahead of time because the leaves will soften up as they "marinate" in the dressing.
I figured this out when I developed my recipe for Salmon-Kale Caesar Salad. When we ate leftovers for lunch the next day, it was even better than the night before.
Lacinato kale (also called, Tuscan, dinosaur or cavolo nero) works better in salads than curly kale, which is tougher. I like to cut out the ribs and chop the leaves into thin ribbons for salads.

2. Make juicy ground turkey every time.
You want to be a little healthier, so you swap ground turkey for beef in one of your favorite recipes. The results are so dry and unappealing that you wish you hadn't bothered.
Don't let this happen again! In order to have great flavor and a texture that doesn't remind you of sandpaper, meat needs fat.
If you want ground turkey that tastes juicy and tender, choose dark meat. My supermarket sells ground turkey breast and ground turkey thigh separately. Sometimes I use half and half, and sometimes I just go with dark meat.
Since a 3-ounce serving of turkey thigh has 5 grams of fat (and only 1.5 grams of that is saturated), and the same portion of turkey breast has 1 gram, the dark meat is still a very healthy choice (source: ohiopoultry.org).
If pre-packaged ground turkey is the only available option, choose one labelled 85% lean (this will be a blend of light and dark meat). In a pinch, 93% lean is okay, but don't go any higher than that!

3. Cook risotto in the oven.
The traditional method is to stir the rice almost constantly for about 25 minutes while slowly adding liquid.
So you're literally standing over a hot stove.
For my Oven-Baked Risotto recipe in the book, I wanted to test and perfect an oven cooking method that I'd read about, but doesn't seem to be very popular.
Long story short, it works like a charm, and here's how you do it:
The rice actually cooks a bit faster than it would on the stove top--15 to 20 minutes. I like to give it a stir once during cooking, but otherwise, it's hands-off!

4. Use fresh mint to perk up your meals.
It's not just for dessert and tea! My rule of thumb: Anywhere you can use basil, you can use mint.
In Greek, Middle Eastern, and Vietnamese cooking, mint is used in countless savory recipes. Think of Greek lamb with mint sauce, tabbouleh, or pho, the classic Vietnamese soup.
Mint is also amazing in just about any green salad. You'll be surprised how much it perks up simple lettuce. One of my fabulous recipes testers used it when she made my Thai Beef Salad recipe, and here's what she had to say:


5. Almond flour is magic for gluten-free baking.
We know almond flour is only low-FODMAP in moderate servings, so I'm not suggesting that you use it on its own.
This wouldn't be a great idea anyway because the finished cake, muffin, cookie, or pancake would have such a dense, heavy texture that it wouldn't even resemble the traditional version.
Instead, try swapping up to half the amount of gluten-free flour in a recipe for almond flour. It adds moisture and provides enough structure that you can often avoid using binders like xanthan gum.
For the record, I'm not saying there's anything wrong with gums health-wise. But they work unpredictably and often produce chewy (or "gummy") baked goods.
My Spiced Zucchini Cupcakes with Cream Cheese Frosting are made with a combo of almond flour and gluten-free flour blend, and here are the results according to my amazing reader recipe tester (who also happens to be a pastry chef):
"The recipe is great. The neighbors loved them and had no idea they were gluten free."

6. Cook whole chicken in the crockpot more often.
This was a technique I hadn't used much previously, but wanted to perfect for the book.
I know a lot of us love the convenience of picking up a rotisserie chicken at the supermarket, but it can be hard to find ones that are unseasoned or not pumped full of weird additives.
Turns out, if you have 5 minutes, you'll never have to read the ingredients on the bottom of a rotisserie chicken (without spilling hot chicken juice on yourself) ever again.
Add about an inch of water to the slow cooker, season the chicken and let that baby cook for 4 hours on high or 8 hours on low for a 4.5 lb chicken.

7. Sometimes you CAN take shortcuts in baking.
There's a saying that goes, "Cooking is an art, but baking is a science." While I agree with the gist of this, it's also misleading.
It makes people feel like baking is a huge chore, and if you mess up one little thing, it's all ruined. Not necessarily so. Let's use my Flourless Chocolate Cakelets as an example.
The traditional way to give this type of cake a light texture (as opposed to the heftiness of your classic brownie) is to separate the eggs and beat the whites until they form soft, voluminous peaks. Then you would delicately fold them into the batter.
Since I don't love doing extra work if it isn't necessary, I didn't bother separating the eggs. I beat them for a few minutes until they doubled in volume, then added them to the chocolate batter.
You can probably guess the result: light, silky cakelets that aren't the least bit heavy (but extremely rich and chocolatey!).
I didn't come up with this genius idea all on my own. A couple years ago, I read a food science article where the writers did this experiment with pancakes and didn't find any major improvement when they separated the eggs versus just adding them whole.
I'm betting this shortcut works in just about any recipe!
Cool stuff, right?!
Have you learned any great cooking tricks lately? Are you itching to get into the kitchen and try out any of the tips above? Let me know in the comments!

Making your own low FODMAP spice mixes and marinades is easy! Get my go-to spice blends for poultry, fish, and meat, plus my favorite simple marinades…all with no onion and garlic.
Thought a low FODMAP Buddha Bowl was impossible? Not so! This IBS-friendly recipe is hearty, colorful, and packed with nutrients...and you'll love the sticky sesame sauce. Time to hop on the trend with this sesame chicken Buddha Bowl!
This healthy Cuban picadillo recipe is easy and flavor-packed thanks to spices, olives and raisins. Serve with a side of sauteed plantains, and you have a mouth-watering low FODMAP dinner!
This low FODMAP taco seasoning adds deep, smoky flavor to the healthy ground turkey. If you crave a new twist on your favorite low FODMAP tacos, try Taco Grits.
Grab your slow cooker, it's easy weeknight Indian food at it's best. This Indian Butter Chicken recipe is low FODMAP and the basmati rice will come out perfect every time.