This low FODMAP taco seasoning adds deep, smoky flavor to the healthy ground turkey. If you crave a new twist on your favorite low FODMAP tacos, try Taco Grits.
If you're just starting out on the FODMAP Diet and feeling lost or overwhelmed, this is dedicated to YOU as you search for help starting FODMAP.
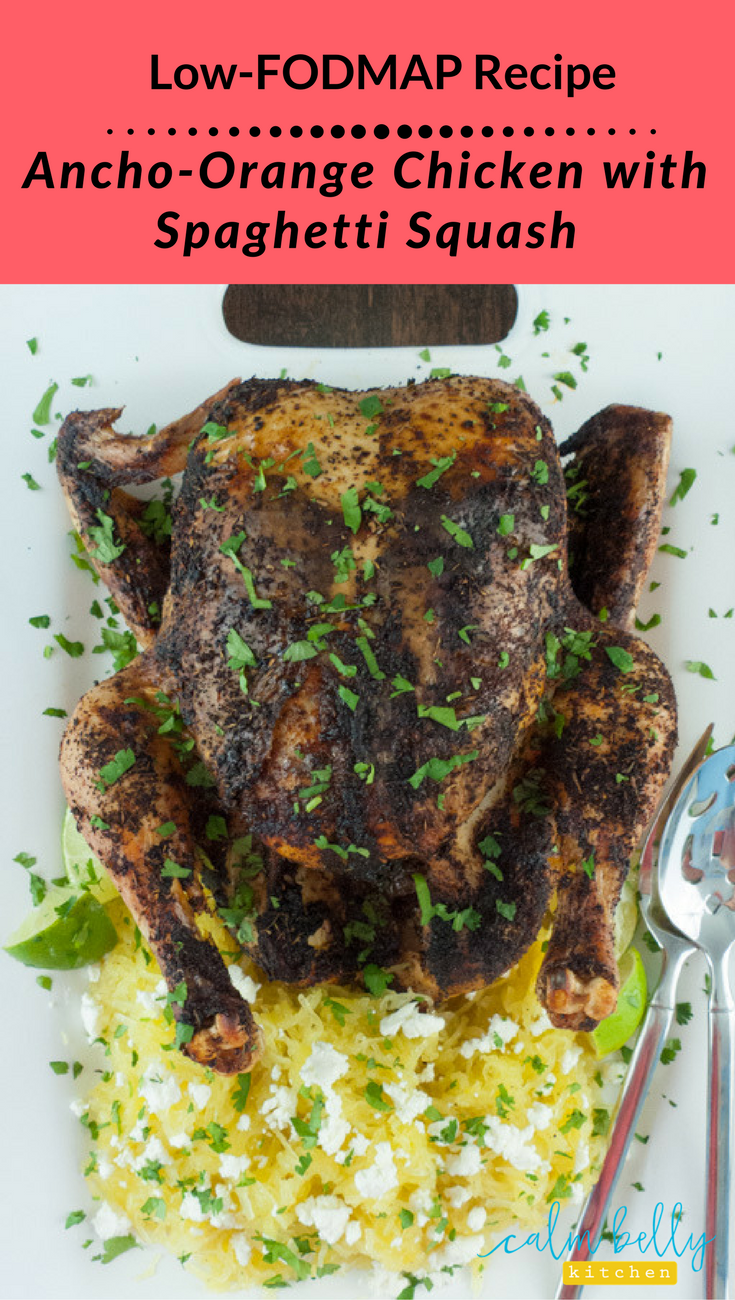
Ancho chile powder is easily the most-used spice in my kitchen, so of course I had to include it in the Low-FODMAP Spices Series.
First let’s clear something up real quick: Ancho chile powder is made from dried and ground ancho chiles, nothing else. The same goes for chipotle chile powder or ground cayenne.
On the other hand, when you see a spice labelled “chili powder” or chili seasoning, it’s usually a blend of many ingredients like cayenne, paprika, pepper, salt, AND ground onion and garlic powders. Since you’re aiming to avoid onion and garlic in the FODMAP elimination phase, chili powders like this are a no-go.
Instead, look for those pure ground chile powders like ancho. The big spice brands like McCormick sell it, so it’s easy to find in large supermarkets these days. If you want to buy it online (along with just about any spice), check out The Spice House.
Catch up on other recipes in the Low-FODMAP Spices Series:
Grilled Chicken with Curry-Lime Marinade
Maple-Soy Chicken Drumsticks with 5 Spice
Easy Coconut-Shrimp Curry with Chickpeas
Ancho chile powder is mild, so if you don’t like a lot of heat in your food this is the one for you. The flavor is slightly sweet and smoky. When you open a jar of fresh ancho chile powder, you’ll notice the scent of dried fruit.
You can use ancho chile powder in Mexican dishes - It’s great paired with cumin, paprika, or coriander. It’s also great as an all-purpose flavor booster for just about any protein.
But I especially like using it in unexpected ways, like in an Italian meat sauce. It won’t make your bolognese taste like Mexican; instead it adds an extra dimension of flavor with its sweet smokiness.
While the chicken rests, you can use those pan juices! Transfer them to a fat separator or a bowl and remove as much fat as possible - you now have homemade broth. Use the juices as a sauce for the roast chicken or later in another dish. If you have time, allow the chicken to come to room temperature for 30 to 45 minutes before cooking - this reduces the roasting time.
Serves 4 (spaghetti squash yields 38-42 oz. cooked)
INGREDIENTS
1 tbsp ancho chile powder
1 tsp dried thyme
1 navel orange, zested
5 to 6 lb chicken
Cooking spray or oil
Salt and freshly ground black pepper
2 ¼ to 2 ½ lb spaghetti squash
1 tbsp extra virgin olive oil
2 oz goat cheese, crumbled
Lime wedges for serving
Chopped fresh cilantro for garnish
INSTRUCTIONS
1. Preheat oven to 425F and arrange oven racks in upper and lower thirds of the oven. In a small bowl, combine ancho chile powder, thyme and the orange zest. Rinse chicken and remove giblets and any excess fat; pat dry with paper towel. Place chicken on a rack inside a large roasting pan. Coat with cooking spray or oil and season generously with salt and pepper, inside and out.
2. Gently lift the skin covering the breasts near the cavity end of the chicken and push a generous amount of the ancho mixture under the skin, seasoning the breast meat. Rub remaining ancho mixture all over the top and sides of the chicken. Place half the orange inside the cavity, and tuck the wing tips under the body of the chicken. Add a thin layer of water (about ¼-inch) to the roasting pan and place on the lower rack of the oven.
3. Roast for 1 hour 30 minutes to 2 hours (see note). After about 1 hour, cover the top of the chicken loosely with large piece of foil to prevent over browning. Chicken is done when internal temp reaches 165F on an instant read thermometer, testing chicken in the center of the breast and thickest part of the thigh, not touching the bone. Rest 10 minutes.
4. As soon as you get the chicken in the oven, prep the spaghetti squash: Trim the stem end, then cut in half lengthwise. Line a large rimmed baking sheet with foil (optional, but minimizes cleanup) and mist with cooking spray or oil and place squash on baking sheet cut-side-down. Roast in upper third of the oven until flesh is very tender when pierced with a fork, 40 to 45 minutes.
5. Transfer squash to a cutting board, cut-side-up to cool. When cool enough to handle, scoop out the layer of seeds and slimy bits of squash. Then with a fork, lightly scrape the squash out of the skin in spaghetti-like strands and transfer to a medium bowl. Add extra virgin olive oil, season with salt and pepper and stir gently to combine. Transfer to serving platter and sprinkle with goat cheese. Serve with chicken and lime wedges, and garnish the whole thing with fresh cilantro.
Just like you wouldn't travel without GPS, don't start the FODMAP Diet without a plan. Learn common challenges others have faced AND how to overcome them.

This low-FODMAP curry has a satisfying creamy texture thanks to coconut milk. But it’s also packed with flavor from a few carefully chosen spices.
If you think high-FODMAP ingredients like garlic, onion, or store-bought broth are necessary for a tasty curry, you’re going to like this recipe.
This post is part of the Low-FODMAP Spices Series, and I chose to highlight coriander with an easy weeknight curry.
Check out the other posts in the Low-FODMAP Spices Series:
Grilled Chicken with Curry-Lime Marinade
Ancho-Orange Roast Chicken and Spaghetti Squash
Maple-Soy Chicken Drumsticks with 5 Spice
You’ve likely tasted coriander, but you may not know it - It’s frequently paired and blended with other spices, but sometimes I like making it the star of the show.
It’s a common mate for cumin and chile powder in Mexican cooking. It also makes frequent appearances in Indian recipes, as well as their signature spice blends like garam masala and curry seasoning.
Coriander has a warm, earthy, slightly citrusy flavor with a sour edge in the background (It comes from the same plant as fresh cilantro leaves, but they taste completely different.). Some people taste lemon, but I get a hint of orange, and I love pairing coriander and orange zest.
It’s fun to select your own curry spices rather than buying the standard yellow “curry powder,” because you can highlight your favorite flavors. And you don’t need to fuss with 10 different spices (exhausting!).
Along with the mellow, earthy coriander, I used cumin for smokiness and depth plus turmeric for that bright yellow color and tangy flavor. As with all spices, make sure they’re fresh so you get the full flavor.
Here a few more ways you can use coriander:
The trio of spices in this curry is definitely a major flavor factor, but cooking technique also makes a HUGE difference.
Here’s how I built flavor during the cooking process:
You can use these techniques in all sorts of recipes!
You can omit the shrimp and add an extra potato to make this dish vegan, or substitute chicken for the shrimp. To prep the leek, cut off the white part and discard the tough outer layers. Here’s the best leek washing technique. In a pinch, you can sub scallion tops for the leek, but cook them for 30 seconds at most.
Serves 4
INGREDIENTS
2 tbsp oil or ghee, divided
1 leek top (green part only), chopped (see note)
Salt and freshly ground black pepper to taste
1 jalapeno, chopped (optional, see note)
1-inch piece fresh ginger, peeled and finely chopped
1 tbsp ground coriander, divided
2 tsp ground cumin, divided
1 medium Russet potato (about 8 oz), peeled and cut into 1-inch chunks (about 2 cups)
2 medium carrots, sliced (about 1 cup)
1 large tomato (about 8 oz), chopped (about 1 cup)
1 1/2 tsp turmeric
1 1/2 cups water
1 (13.5 oz) can coconut milk, regular or light
1 slightly heaping cup canned and rinsed chickpeas (168 g)
3/4 pound medium shrimp
1/2 lime
Chopped fresh cilantro for serving
INSTRUCTIONS
1. Heat 1 tbsp of the oil in a large sauce pan or Dutch oven on medium heat. Add leek, season with salt and pepper and cook, stirring frequently, until lightly browned, about 5 minutes. Add jalapeno, ginger, and ½ tsp EACH of the coriander and cumin. Cook until jalapeno softens, 1 to 2 minutes. Transfer to a small bowl and set aside.
2. Add remaining oil to pan and raise heat to medium high. Add potato and carrots, season with salt and pepper and cook, stirring frequently, until carrots softens slightly, about 5 minutes. Add tomato, remaining coriander, remaining cumin, and turmeric; season with salt and pepper. Cook, stirring frequently, until tomato breaks down and becomes saucy, 5 to 6 minutes.
3. Add water. Raise heat to high and bring to a boil. Add coconut milk and bring to a boil. Add chickpeas. Reduce heat to medium/medium-high and cook, uncovered, at a steady simmer until potatoes and carrots are tender, about 10 minutes.
4. Add shrimp and simmer, stirring occasionally, until opaque in the thickest part, 2 to 3 minutes. Stir in reserved leek mixture and remove from heat. Stir in juice of half a lime. Taste for seasoning and add salt and pepper if desired. Serve over Perfect Basmati Rice (recipe below) and garnish with cilantro.
You can use brown basmati if you prefer; follow cooking instructions on the package.
Serves 4 to 6
1 tbsp unsalted butter
1 cup white basmati rice
2 cups water
½ tsp salt
In a medium saucepan, melt butter on medium heat. Add rice and cook, stirring frequently, until grains become partially opaque, about 2 minutes. Add water and salt. Raise heat to high and bring to a boil. Reduce heat to lowest setting, cover, and cook for 17 minutes. With cover still in place, rest 10 minutes. Fluff with a fork and serve.
The FODMAP elimination stage should last 4 to 8 weeks. Read the 3 key reasons why you should complete BOTH phases of the FODMAP diet and bring the foods that don’t trigger your symptoms back into your life.
Just like you wouldn't travel without GPS, don't start the FODMAP Diet without a plan. Learn common challenges others have faced AND how to overcome them.
What can you order at a Chinese restaurant on the low-FODMAP diet? Read a quick summary of good menu options, and learn about why these are your best bets.

The easy sauce for these chicken drumsticks has just THREE ingredients, but a huge flavor payoff. If you’re bored with the same old chicken dishes, this will wake up your taste buds!
The key ingredient here is Chinese 5-Spice.
Like the name suggests, it’s a blend of 5 spices: typically fennel, cinnamon, star anise, Szechuan pepper, and cloves. But this combination isn’t set in stone - sometimes ginger, cardamom, anise (different from fennel and star anise) nutmeg, or orange peel are substituted or added to the mix.
Overall, 5-spice comes off as sweet with slightly bitter undertones and a zip of licorice from the fennel. With so much going on, a little bit goes a long way.
You can find Chinese 5-Spice in most supermarkets or online. Naturally, it’s great in Asian stir frys, braised dishes, and soups. It’s a perfect match for pork, lamb, and duck, as well as dark meat chicken and turkey. But there are plenty of unexpected ways to use it...
How To Use Chinese 5-Spice:
To flavor roasted nuts (toss with butter and 5-spice)
For glazed carrots (like these)
On stir fried green beans
In Vietnamese pho
Add to muffins or quick bread
Spice up oatmeal, sweet grits, or other hot cereal
Add to spice cookies or Chinese almond cookies
In sauce for stir fried rice noodles
Add to ground lamb and rice stir fry
In lamb or beef stew
Season roast or braised duck
On roasted vegetables like parsnips, squash, rutabaga, and celery root
This post is part of a series on low-FODMAP spices. Check out the other posts below:
Grilled Chicken with Curry-Lime Marinade
Ancho-Orange Roast Chicken and Spaghetti Squash
Easy Coconut-Shrimp Curry with Chickpeas
You can change up this recipe by using chicken wings or thighs; adjust baking time accordingly. Finishing the chicken under the broiler crisps the skin and helps thicken the sauce. If you prefer, you can remove the skin before baking; bake until temp reaches 165F, do not broil.
Serves 6
INGREDIENTS
3 lbs chicken drumsticks (about 12)
½ cup pure maple syrup
2 tbsp soy sauce or tamari
1 tsp Chinese 5-Spice
Sesame seeds for garnish
Chopped scallion tops for garnish
INSTRUCTIONS
1. Preheat oven to 375F. Place chicken in a 9 x 13-inch baking dish or similar size that fits chicken in a single layer.
2. In a medium bowl, whisk together the syrup, soy sauce, and Chinese 5-Spice. Pour over chicken. Bake until chicken is no longer pink in the thickest part or temperature reaches 160F on an instant-read thermometer, 35 to 40 minutes, basting chicken with maple sauce 2 to 3 times during baking.
3. Turn on broiler to high and place an oven rack in the upper third position (8 to 10 inches from broiler). Broil until chicken is lightly browned and internal temp reaches 165F, 4 to 5 minutes. Transfer to a serving dish and pour remaining sauce over chicken. Garnish with sesame seeds and scallions and serve.
Just like you wouldn't travel without GPS, don't start the FODMAP Diet without a plan. Learn common challenges others have faced AND how to overcome them.

Adding curry seasoning to an otherwise simple marinade gives it a whole new twist, and that’s how today’s recipe was born.
Having a few great spices and marinades up your sleeve is essential for tasty low-FODMAP cooking. Since sweet curry powder is a blend of spices typically used in Indian cooking, it packs a lot of flavor into a dish without much effort--this marinade only has 6 ingredients (plus salt)!
You can find sweet curry powder in most supermarkets, and of course online. It has little to no heat and is highly versatile.
Other ways to use sweet curry powder:
Season roast vegetables
Season grilled or baked fish
Add to dips or yogurt sauce
Spice up chicken or tuna salad
Add to rice

I served this chicken with basmati rice seasoned with cumin and allspice. I love to make sauces like this on the fly with whatever I have on hand so that’s what you see here.
I used lactose-free plain yogurt, lemon juice, parsley, chopped tomatoes, and a couple dashes of curry powder.
Want more? Check out the other posts in the Low-FODMAP Spices Series:
Easy Coconut-Shrimp Curry with Chickpeas
Ancho-Orange Roast Chicken and Spaghetti Squash
Maple-Soy Chicken Drumsticks with 5 Spice
And one more great curry recipe: Easy Slow Cooker Indian Butter Chicken and Perfect Basmati Rice
You can substitute any other chicken pieces (boneless or bone-in), but cooking times will vary. Sweet curry powder (also called “yellow” or “mild”) is a blend of spices that typically does not include onion or garlic, but always check the ingredient list to avoid any FODMAPs.
Serves 4 to 6
INGREDIENTS
1 ¼ cup (lightly packed) cilantro (leaves and thin stems), plus additional for garnish
⅔ cup chopped scallions (7 to 8)
7 tbsp lime juice (3 to 4)
7 tbsp oil (olive, grapeseed, or vegetable oil)
1 tbsp Dijon mustard
3 tsp sweet curry powder (see note above)
1/2 tsp salt
2 lbs boneless, skinless chicken thighs (about 8)
INSTRUCTIONS
1. Add cilantro and scallions to the bowl of a food processor fitted with the metal blade. Pulsing in 5-second bursts, process until chopped, scraping down bowl as needed. Add lime juice. With processor running, slowly pour in the oil through the feed tube.
2. Add mustard, curry powder, and salt. Process until combined, scraping down bowl as needed.
3. Place chicken thighs in a heavy duty zip top plastic bag. Add marinade and seal. Shake the bag a bit to coat chicken. Refrigerate 4 to 24 hours, turning back once or twice. When ready to grill, transfer chicken to a plate (discard marinade) and bring to room temperature.
4. Prepare a charcoal or gas grill (high for gas) and brush grate with oil. Grill chicken over direct heat, turning once or twice, until internal temperature reaches 165F on an instant-read thermometer or center is no longer pink, 7 to 9 minutes. Rest 5 minutes, garnish with cilantro, and serve.
Making your own low FODMAP spice mixes and marinades is easy! Get my go-to spice blends for poultry, fish, and meat, plus my favorite simple marinades…all with no onion and garlic.
Exercise can improve IBS symptoms, but what exactly should YOU do to reap the benefits? What are the best exercises for bloating, for IBS-D, for IBS-C? Should you workout during a flare up? Click through to learn all this and more.
Whether it’s a decadent dessert, sweet breakfast, or romantic dinner, we’ve got you covered with 21 low FODMAP recipes perfect for your Valentine’s Day.
It can be tough to diagnose SIBO because it isn’t completely understood, and often looks like other things. This guide will help you sort through the facts we DO know and point you to more resources so you can learn what’s going on with your gut.
These low FODMAP blueberry muffins make the perfect grab-and-go breakfast or snack to calm a craving, complete with streusel topping!
Read the top 4 most common challenges that come with the FODMAP Diet AND my best tips to overcome them. These tips haven’t just worked for me--they’ve helped hundreds of clients and community members to improve their IBS symptoms faster, and without the struggle.
Thought a low FODMAP Buddha Bowl was impossible? Not so! This IBS-friendly recipe is hearty, colorful, and packed with nutrients...and you'll love the sticky sesame sauce. Time to hop on the trend with this sesame chicken Buddha Bowl!
The FODMAP elimination stage should last 4 to 8 weeks. Read the 3 key reasons why you should complete BOTH phases of the FODMAP diet and bring the foods that don’t trigger your symptoms back into your life.

Chimichurri is a sauce from Argentina made with fresh herbs and typically served over grilled meat. Since the sauce is uncooked it’s not only a snap to make, but the perfect summer condiment.
Chimichurri should be renamed “magic sauce,” because it’s magically delicious on just about anything. I’ve used it on:
Grilled steak, pork chops, and chicken breasts
Grilled fish and shrimp
Sandwiches
Eggs
Rice bowls
Tacos
If you’ve been to an Argentinian steak house, you’ve likely had chimichurri. The classic recipe includes a good amount of raw garlic, which I never liked (before the FODMAP Diet, I would actually cook the garlic before adding it to the chimichurri).
Luckily, the sauce is just as good sans garlic. In my opinion, it’s better. If you love garlic flavor, substitute garlic infused oil for 1 to 2 tablespoons of the olive oil.
You’ll also find my recipe for roasted potatoes below, which is a typical side for an Argentinian grilled meal. The potatoes couldn’t be simpler, but I like to think I’ve perfected the method over the years to make the perfect roasted spuds. :-)
Looking for more low-FODMAP grilling recipes? Check out Lemon-Caper Fish and Veggies Grilled in Foil Packets and Caprese Salad with Grilled Eggplant!
If you prefer sirloin or another cut of steak, go for it! The recipe calls for bone-in NY strip because that’s what I used, but boneless is great too. The sauce is also delicious on grilled pork, chicken, and fish. To use as a marinade, add extra olive oil and/or lime juice to thin.
Serves 4 - Makes about ¾ cup sauce, double recipe if needed (1 serving = 3 tbsp)
INGREDIENTS
1 cup (packed) parsley (leaves and thin stems)
1/4 to 1/3 cup mint leaves (about 4 sprigs)
1 tbsp red wine vinegar, plus additional if needed
1 lime, juiced
¼ cup extra-virgin olive oil, plus additional if needed
2 tsp Dijon mustard
1 tsp granulated sugar (or your sugar of choice)
1/2 tsp red chile flakes, or to taste (optional)
Sea salt to taste (1/4 to 1/2 tsp)
Freshly ground black pepper to taste
2 lbs bone-in New York strip (see note above)
INSTRUCTIONS
1. Add parsley and mint to a food processor and blitz until finely chopped, scraping down bowl as needed. Add vinegar and lime juice. With processor running, slowly pour olive oil through the feed tube.
2. Add mustard, sugar and chile flakes if using. Season with salt and pepper. Pulse until blended. Consistency should be thick but pourable. Add additional oil or red wine vinegar to thin, depending on whether you like more or less acidity. Check seasoning. Can be used as a marinade, or served over grilled meat or fish. May be stored in the refrigerator up to 2 days. Serve at room temp.
3. Prepare a charcoal or gas grill (high for gas) and brush grate with oil. Season steaks with salt and pepper. Grill steaks over direct heat, turning once or twice, until done to your liking, 10 to 12 minutes for medium rare (130F to 135F). Rest at least 5 minutes. Slice and serve family style drizzled with chimichurri sauce.
Serves 4
Cooking spray
2 lbs yellow potatoes, cut into 1-inch chunks
1 to 2 tbsp olive oil
Salt and freshly ground black pepper to taste
1. Preheat oven to 400F. Line a large, rimmed baking sheet with foil (optional, to minimize clean up) and coat with cooking spray. Add potatoes and drizzle with oil. Season with salt and pepper and toss to coat.
2. Roast until potatoes are golden brown and very tender with pierced with a fork, tossing 2 times during cooking, 35 to 45 minutes.

This recipe comes from The Low-FODMAP Cookbook by Dianne Fastenow Benjamin. It's a healthy and tasty dish that gets a lot of flavor from just a few simple ingredients.
Read on to see what I think of the cookbook and get the recipe!
I love that this salmon looks beautiful enough to serve to guests, but it's simple enough to make on a weeknight. The key to this magic is minimal ingredients that pack a lot of flavor. Specifically, maple syrup, soy sauce, and garlic-infused oil.
The marinade is so good, my only complaint is that I wanted more of it. I might make extra next time and reserve a bit to drizzle over the finished salmon.
If you've ever searched for "FODMAP" on Pinterest, I'm 99.9% sure you've come across Dianne's recipes. She's been posting low-FODMAP meals on her blog Delicious As It Looks for years. I'm also biased to like whatever Dianne does because she's a pug lover like me!
But back to the cookbook. It's a great collection of approachable and tasty recipes. There aren't any hard-to-find ingredients or advanced techniques so it's great for beginner cooks.
The recipes tend toward American home cooking and comforting flavors, for example:
The recipe sections are: basics, breakfasts, soups, salads and sides, soups, main dishes, and desserts. There's also a useful introductory section on navigating the FODMAP diet.
Some recipes that I bookmarked to try:
I love seeing new FODMAP cookbooks on the market, and this is a great one if you love unfussy, American favorites. After spending the first part of 2016 writing The Calm Belly Kitchen Cookbook, I love sitting back and testing other people's recipes for change--and Dianne's look fabulous!
Adapted from The Low-FODMAP Cookbook
To make it weeknight-friendly, the recipe calls for instant rice. You could just as easily cook up a pot of rice the traditional way, or make it ahead of time. To garnish, I reserved a few sesame seeds and used fresh pea shoots...totally optional but cute!
Serves 4
Ingredients
1/4 cup garlic-infused oil
1/4 cup pure maple syrup
2 tbsp gluten-free soy sauce or tamari (I used low-sodium)
1/4 tsp freshly ground black pepper
4 (4-oz) salmon fillets, skin removed
Cooking spray
1 3/4 cups water
1/2 to 3/4 tsp kosher salt (to your taste)
2 cups instant brown rice
4 cups baby spinach leaves
1 tbsp toasted sesame seeds
1 tbsp dark/toasted sesame oil
4 scallion tops, sliced
Instructions
1. In a medium bowl, whisk together the garlic oil, maple syrup, soy sauce and black pepper. Place salmon fillets in a large zip top bag and add garlic-maple mixture. Toss to coat and refrigerate for 2 to 4 hours.
2. Preheat oven to 400F. Line a large, rimmed baking sheet with foil and mist with cooking spray. Place salmon on baking sheet and drizzle a bit of the marinade over the top. Bake until salmon is opaque in thickest part and reaches 145F on an instant read thermometer, 12 to 18 minutes, depending on thickness.
3. Meanwhile, bring the water and salt to a boil in a large saucepan. Stir in rice and return to boiling. Reduce heat to low, cover, and simmer for 5 minutes. Remove from heat and rest, covered, 5 minutes more.
4. Mist a large nonstick skillet with cooking spray and heat to medium-high. Add spinach and cook until wilted. Reduce heat to low and add rice, sesame seeds and sesame oil (If your skillet is too small to fit all the rice, add the spinach to the saucepan with the rice instead). Toss gently to coat. Divide rice among 4 plates and top with salmon. Garnish with scallions and serve.
Disclosure: This post includes affiliate links.

Whenever a vacation is coming up and I’m looking for good restaurants to try, I will always scout out the best tapas bars. I don’t care if we’re hitting up Boston, Madrid or Wilmington, North Carolina. If I’m going to be eating out, any restaurant with a great meat and cheese plate is my #1 choice.
That’s exactly how it was on my last trip...People like to say London isn’t a great foodie destination, but that must be because they’re eating actual English food in England. I can point you to a very tasty tapas place, as well as a legit pintxos bar just off the beaten path. I ate at both of them twice. In 7 days.
It’s very do-able to go out for tapas and keep the FODMAPs in check (the aforementioned charcuterie plate is great way to go). However. I passionately believe that eating is one of the best things we get to do as humans, and every meal should be a tiny celebration of that.
So let’s bring the tapas directly to your kitchen where you get to choose the ingredients and keep those FODMAPs low, low, low. This menu is what life can look like on the FODMAP diet--even in the elimination and reintroduction phases.
Forget the notion that low-FODMAP cooking equals a depressing plate of steamed rice, plain grilled chicken and 12 green beans. When you do the FODMAP diet, there’s a very good chance you’ll have to change the way you cook and eat. But it doesn’t need to be a change for the worse!
This is at the core of how I coach clients through the FODMAP diet>>>No giving up great meals OR missing out on the soul-nourishing social aspects of eating.
This menu would please even the most jaded judge on Top Chef (okay, maybe not Padma; is she ever in a good mood?), but more importantly YOU won’t feel deprived even though there isn’t a garlic clove in sight.
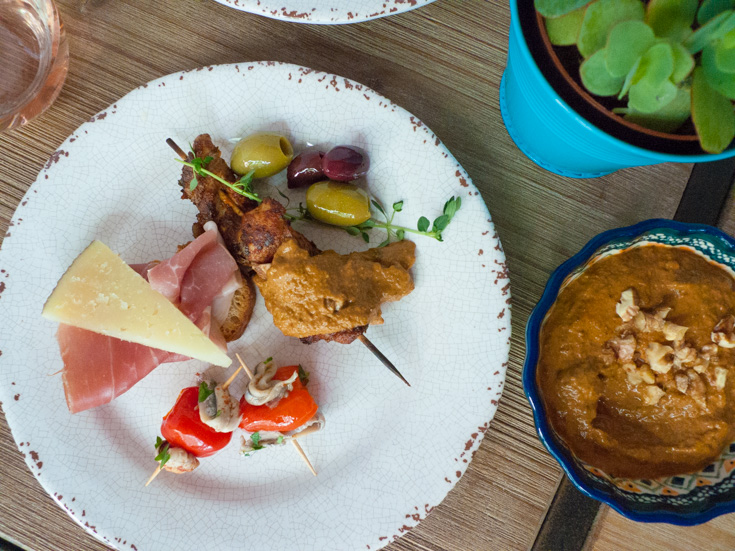
The best part about tapas is that you don’t have to cook every last thing. I’ve got 4 simple recipes (plus sourdough toasts), AND 2 no-cook tapas to fill out your menu.
Are you a tapas junkie like me, or is this type of meal new to you? Either way, invite some friends over to try out these recipes--they will never think you’re on a restricted diet.

This classic dish is on nearly every tapas menu, and all it takes is some lovely garlic-infused oil! And since most restaurants don’t bother adding finely grated, fresh lemon zest, yours might just be superior.
Serves 4 to 6
1 large lemon, rinsed well and dried
1 lb medium shrimp, peeled and deveined
Salt and freshly ground black pepper to taste
1 tbsp olive oil or cooking spray
2 tsp garlic-infused oil
1 tbsp chopped fresh parsley
Thyme sprigs for garnish
1. With a vegetable peeler, peel off one (3-inch) strip of the skin (the “zest”) and reserve for garnish. Zest the rest of the lemon with a microplane grater and set aside. Squeeze about 2 tbsp juice from the lemon and set aside.
2. Pat the shrimp dry with paper towels and season with salt and pepper. Heat the oil in a large skillet on medium-high, or mist skillet with cooking spray.
3. Add shrimp and cook without moving until bottom sides are golden brown, 2 to 3 minutes (Cook shrimp in 2 batches if necessary to avoid crowding the pan and get better browning). Turn and repeat on opposite side until shrimp are opaque in the thickest part, 2 to 3 minutes more. Transfer to a large bowl.
4. To the bowl, add garlic oil, parsley, lemon zest, and lemon juice; stir gently to combine. Transfer to a serving bowl, garnish with lemon strip and thyme, and enjoy.

These look so pretty on the table--like you paid too much for them at a fancy deli. I’m giving you two options here, depending on the time you want to spend. Both work, but you will get more flavor with the heat method.
Serves 4 to 6
1 naval orange
1 cup extra virgin olive oil
3 small dried red chiles
2 dried bay leaves
4 sprigs fresh thyme, plus additional for garnish
⅔ cup large green olives, pitted
⅔ cup kalamata olives, pitted
1. With a vegetable peeler, peel the skin (the “zest”) off the orange in 3 to 4-inch strips. Juice the orange until you have about 2 tbsp juice. Refrigerate juice until step 3.
2. Shortcut method: To a shallow bowl or baking dish, add the orange zest strips and remaining ingredients. Cover and refrigerate overnight (it’s okay if you only have a few hours to do this, but longer is better).
Heat method: Add 1 cup oil to a medium saucepan and heat on medium-low. When oil is shimmering and viscous (do not let it get steamy or start smoking; lower the heat if needed), add the orange zest strips, dried chiles, bay leaves, and 4 thyme sprigs. Reduce heat to low and wait 2 minutes. Remove from heat. Set aside until cool.
Add olives to a shallow bowl or baking dish and add the oil mixture. Cover and marinate at room temp for up to 1 hour or refrigerate overnight.
3. Whatever method you used, bring olives to room temp if chilled. With a slotted spoon transfer to a serving bowl; add a few tablespoons of the oil to bowl, but not all of it. Add reserved 2 tbsp orange juice and stir gently to combine. Garnish with additional fresh thyme and serve.
NOTE: You can use the remaining oil marinade for dipping, or anywhere you would use olive oil. It will keep in the refrigerator (do not leave at room temp or bacteria can grow) up to 1 week.
This thick sauce, build around roasted vegetables and nuts, usually includes garlic, as well as stale bread as a thickener. My version is lighter and brighter thanks to plenty of veg, which means more room for Manchego.
Serves 4 to 6 (makes about 1 ½ cups)
1 dried ancho chile pepper or 1 ½ tsp ancho chile powder
⅓ cup (generous) walnuts (about 45 grams)
Cooking spray
1 red bell pepper, seeded and cut into 3 to 4 pieces
2 medium tomatoes, halved
5 scallion tops
2 tbsp extra-virgin olive oil
1 tbsp garlic oil
1 tbsp red wine vinegar
Salt and freshly ground black pepper to taste
1. If using dried ancho chile, place in a small bowl and cover with boiling water. Soak 15 minutes or until soft. Pat dry with paper towels. Cut open the chile and remove the stem and as many seeds as you like (anchos aren’t very spicy). Set aside.
2. Preheat oven to 325F. Spread walnuts on a baking sheet and bake until fragrant and lightly toasted, 8 to 10 minutes, tossing nuts around the baking sheet about halfway through. Set aside and cool completely (maybe done up to several days ahead). When cool, roughly chop walnuts and reserve 1 tbsp for garnish.
3. Raise oven temp to 425F. Line a large rimmed baking sheet with foil (optional, to minimize clean up) and mist with cooking spray. Add bell pepper, tomatoes and scallions; mist with cooking spray and season with salt and pepper. Roast each veggie until browned and very tender, removing from oven as needed: about 12 minutes for the scallions; about 32 minutes for the tomatoes; about 38 minutes for the peppers. When peppers are cool enough to handle, peel off the skin and discard.
4. To the bowl of a food processor, add all but 1 tbsp walnuts and pulse until roughly chopped. Add the ancho chile if using, the roasted veggies, and the remaining ingredients (if using chile powder add it now). Blitz until you have a slightly chunky puree. Romesco sauce should be thick but easy to dollop off a spoon (not quite as thick as hummus). Add water, 1 tablespoon at a time, to thin as needed (I used 2 to 3 tbsp).
5. Transfer sauce to a serving bowl and garnish with reserved walnuts. Serve with chicken skewers. May be made up to 1 day ahead and refrigerated. Serve at room temp.
Smoked paprika is a major flavor in Spanish cooking, and it doesn’t resemble the common red stuff you’re probably familiar with. It’s incredibly smoky, earthy, and almost pungent (and it’s readily available in most supermarkets). Soaking the skewers is an extra safety measure to keep them from catching fire.
Serves 4 to 6
12 small bamboo/wooden skewers (6-inch), soaked in water for at least 30 minutes
6 boneless, skinless chicken thighs (about 1 ⅓ lbs)
1 tbsp smoked paprika
2 tsp cumin
1 tsp dried oregano
Salt and freshly ground black pepper to taste
Cooking spray
1. Cut each chicken thigh into 4 strips, trimming off any large bits of excess fat as you go. Thread chicken onto skewers, using 2 strips per skewer. In a small bowl, combine paprika, cumin, oregano and salt and pepper.
2. Preheat broiler to high and position rack in upper third of oven. Alternatively, you can cook the chicken on an outdoor grill. Coat a large, rimmed baking sheet or broiler pan with foil and mist with cooking spray. Place chicken skewers on the baking sheet and coat both sides with cooking spray. Sprinkle spice blend all over chicken and use your hands to rub into the meat.
3. Broil or grill until chicken is opaque in the thickest part, 3 to 4 minutes per side. Transfer to a serving dish and serve with Romesco sauce.
Traditionally made, slow-rise sourdough is low-FODMAP (the sugars are consumed by yeast during the fermentation process)! If prefer, gluten-free bread or crackers, those would be fabulous too. Baking the toasts until they are completely crisp allows you to make them ahead of time if needed.
1 sourdough baguette, sliced
Olive oil cooking spray
Preheat oven to 375F. Coat a large, rimmed baking sheet with foil and mist with cooking spray. Add bread in a single layer and mist both sides with cooking spray. Bake until deep golden brown on both sides, and very crisp, 12 to 14 minutes, turning about halfway through. Serve immediately or cool and store in an airtight container up to 6 hours (toasts will stay crisp like crackers).
Fill out your menu with these delicious options--just shop and assemble!
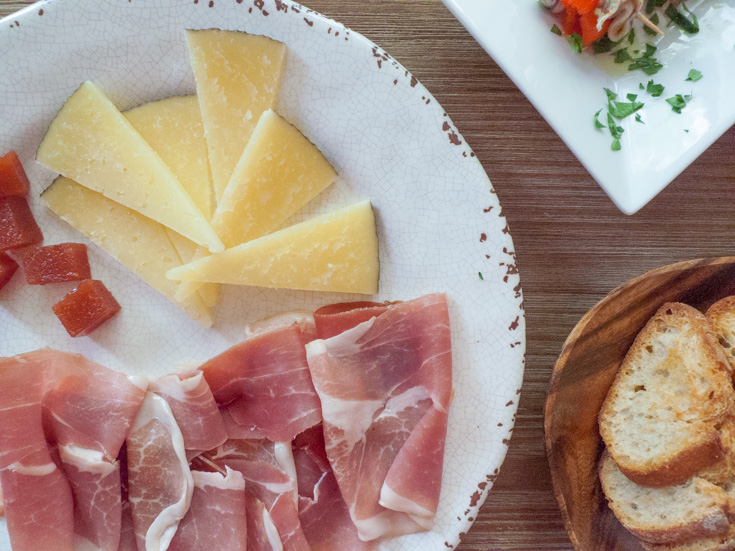
The classic options are Manchego (an aged sheep’s milk cheese) and jamon serrano. When I went shopping, there was no serrano, so what you see in the picture is actually speck, or smoked prosciutto. Regular prosciutto is great too. If you’re feeling very fancy, you can splurge on jamon iberico.
The pink jelly squares are quince paste, a classic accompaniment, which has actually been tested for FODMAP content by Monash (½ tbsp or 13 grams is green light, and 1 tbsp is yellow)! It’s very sweet, like jam, so you only need a little to pair with the meat and cheese for amazing salty/sweet contrast.

The little fish on toothpicks are Spanish-style marinated anchovies, or boquerones. These are amazing, and taste nothing like the super-salty anchovies typically used for Caesar salad. They can be hard to find (I got them at Whole Foods), but Spanish-style tuna would be the perfect alternative (pretty much any canned or processed seafood from Spain is insanely good). If the tuna isn’t firm enough to stay on the toothpicks, stuff it inside the peppers.
The little red peppers are piquillos, which are both sweet and a little spicy. If you can’t find them (try Trader Joe’s or the olive bar at a nice supermarket), substitute roasted red bell peppers. To serve, I drizzled garlic oil over the boquerones skewers and sprinkled on some parsley.
Whether it’s a decadent dessert, sweet breakfast, or romantic dinner, we’ve got you covered with 21 low FODMAP recipes perfect for your Valentine’s Day.
These low FODMAP blueberry muffins make the perfect grab-and-go breakfast or snack to calm a craving, complete with streusel topping!
Thought a low FODMAP Buddha Bowl was impossible? Not so! This IBS-friendly recipe is hearty, colorful, and packed with nutrients...and you'll love the sticky sesame sauce. Time to hop on the trend with this sesame chicken Buddha Bowl!
This low FODMAP pasta salad will be your new go-to recipe. It can be made ahead, plus it's fresh, summery, and perfect for get-togethers.
Today's recipe is:
Easy (as in, "after-work easy")
Cheesy (easy and cheesy!)
Low-FODMAP (and gluten free)
Made completely in one pan
Crazy-good
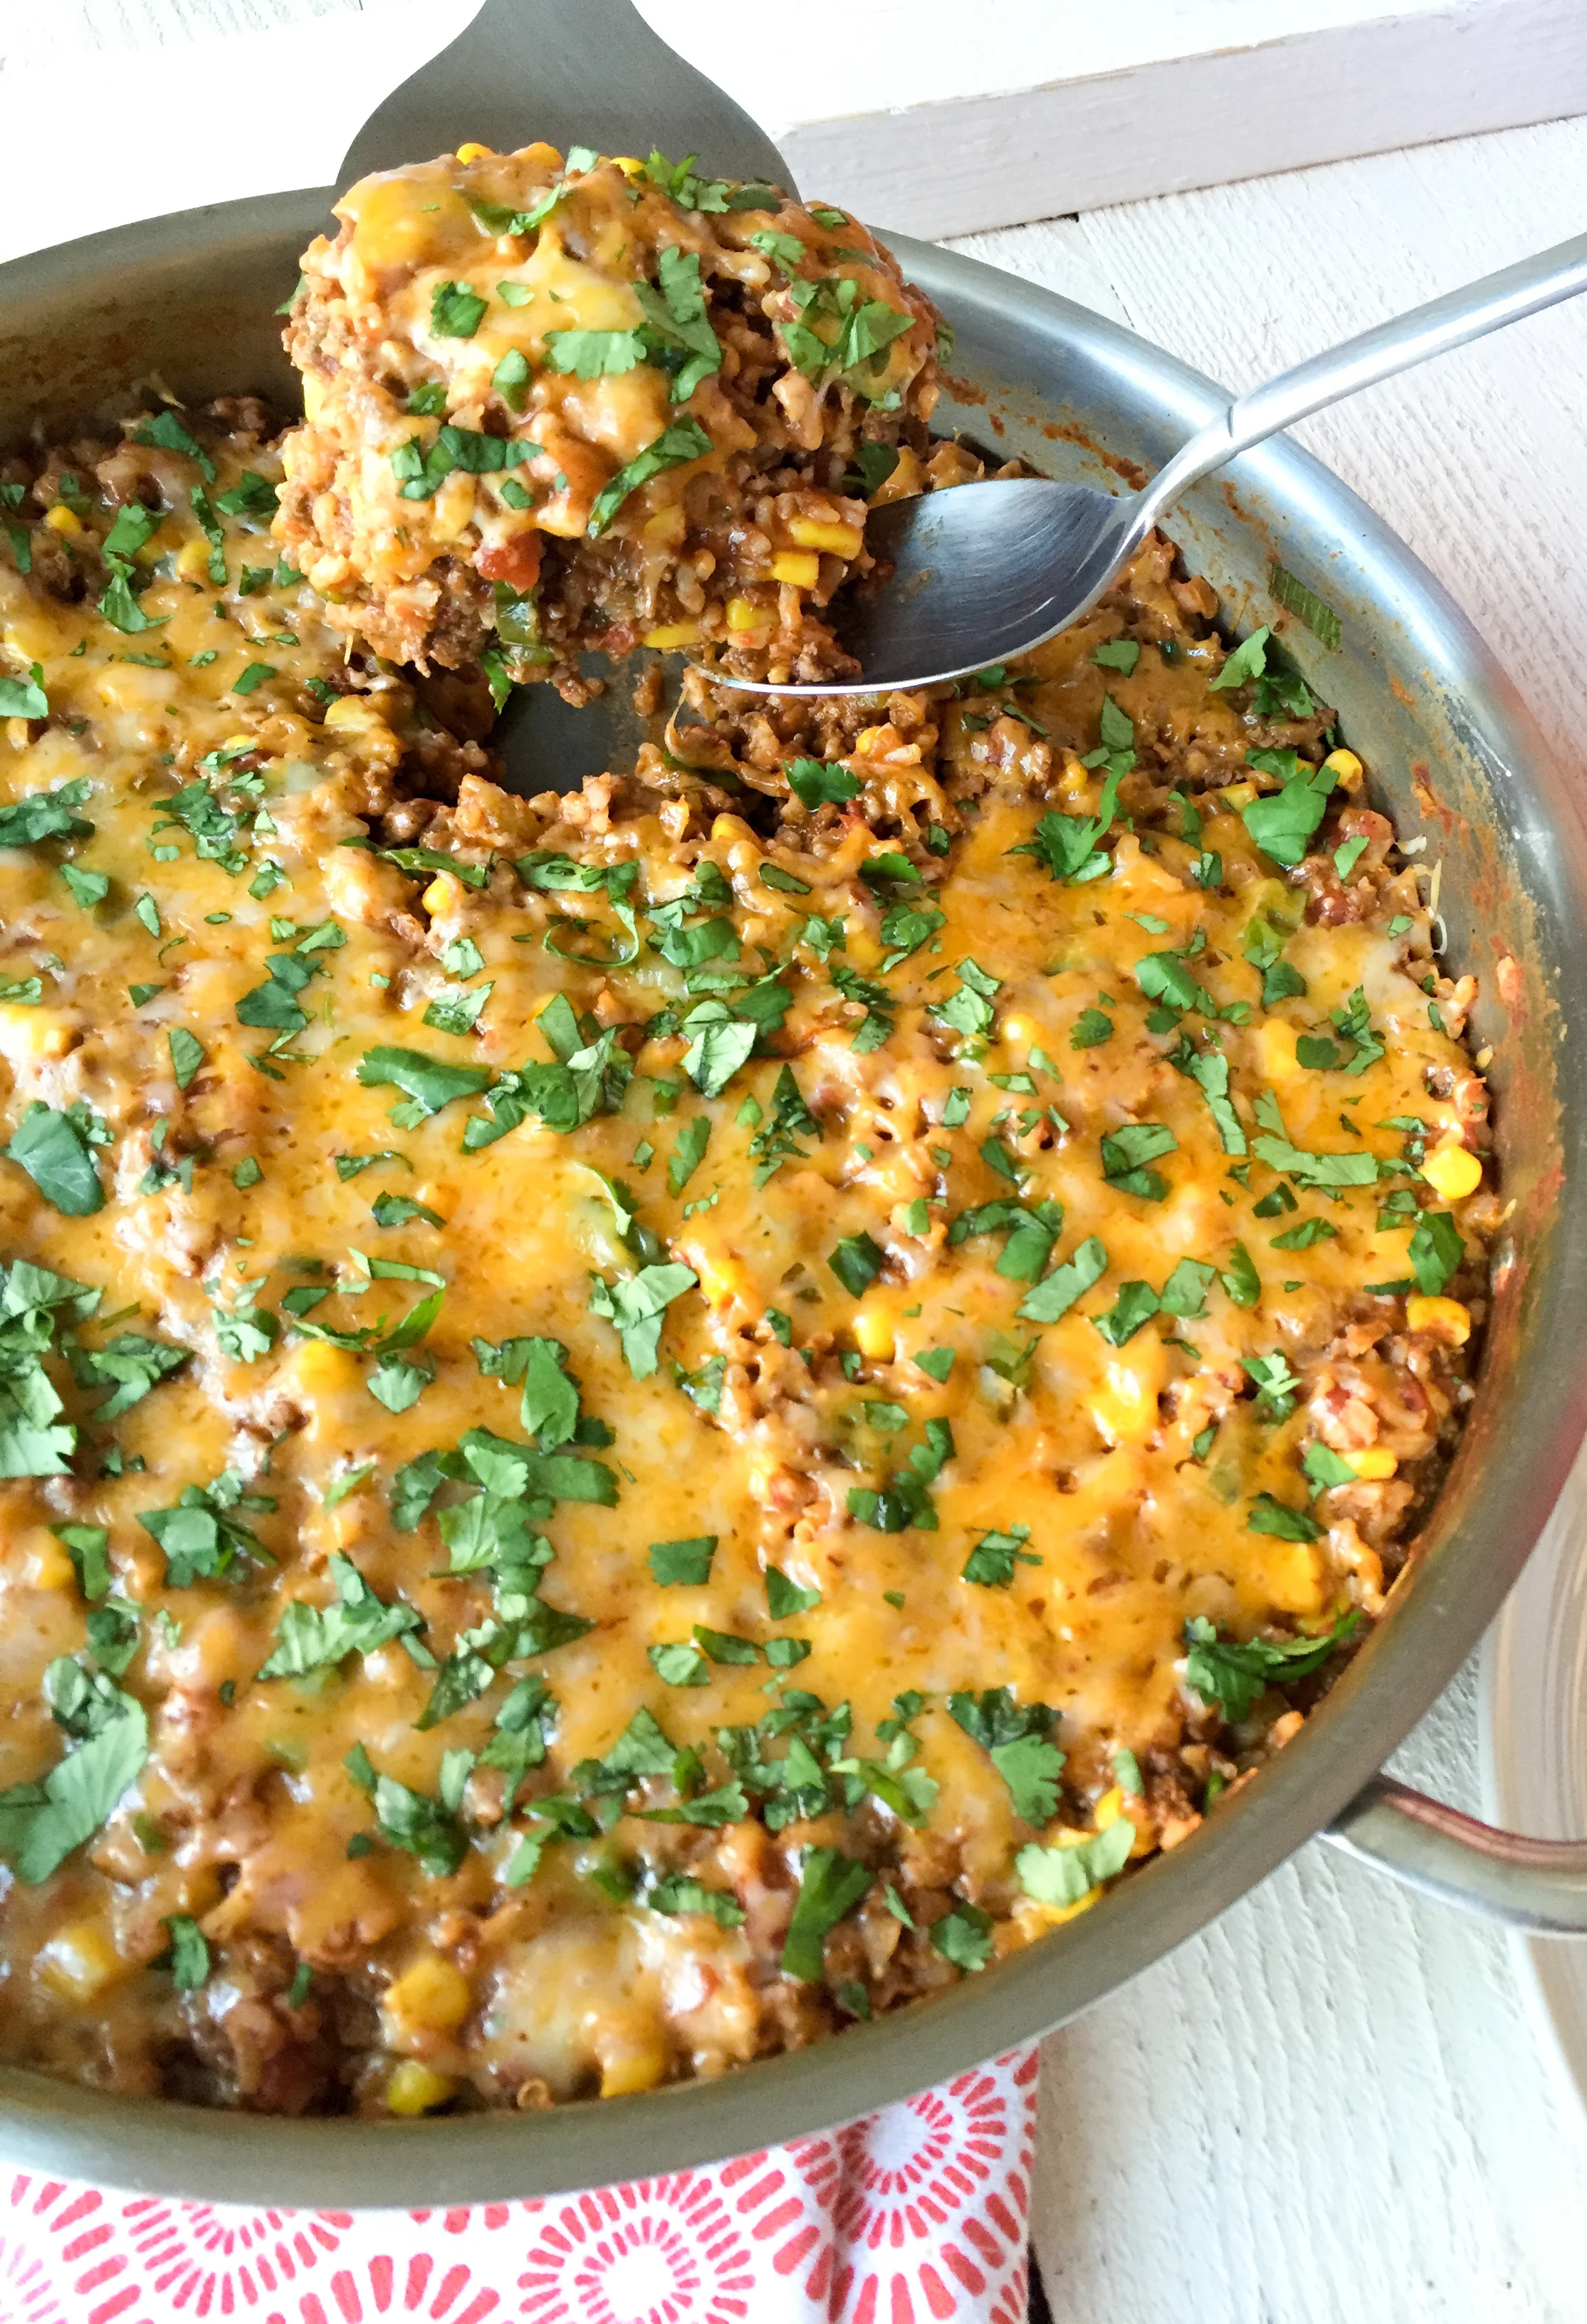
This magical unicorn of a recipe is my One-Pan Cheesy Mexican Rice with Ground Beef. Not only is it a tasty, all-in-one, low-FODMAP meal, it's the first recipe I'm sharing from the Calm Belly Kitchen Cookbook.
It's also got a really great backstory.
I've been developing the recipes for this cookbook since January. I planned them out and put them on my calendar. Week after week, I'd churn out a few more: testing them, planning the photo shoots and props, writing the text.
(For the record, it's an ebook, but I couldn't resist that cool mock up!)

Some of my original recipe ideas didn't pan out like I expected, or they just didn't fit into the book as it took shape. Somewhere in March, I figured out that I had about 45 recipes, but I wanted to hit 50.
So I asked you guys! If you've been part of the Email Crew for awhile, you might remember that around the end of March I asked you to nominate recipes you'd like me to create for the book.
The suggestions were priceless because I got tons of insight into what you're really craving. I picked my top 3 and left it up to a vote. One-Pan Cheesy Mexican Rice with Ground Beef was the clear winner.
A few people in the community have already tried it out and posted about it on Facebook:


I'm so glad I decided to ask for input (and help with recipe testing!) from the Calm Belly Community. It's made this book so much better than it could have been if I'd just worked away in secret.
The full recipe for my Cheesy Mexican Rice is below for you to try out...
...Or just snap up your own copy of the Calm Belly Kitchen Cookbook right now!

It's best to use “instant” or “minute” rice since it takes a bit longer to cook with this method. I like using brown rice, but instant white rice will also work and should cook faster (use 1 ½ cups water for instant white rice). Regular white rice also works, but you'll need more water and the cooking time will be about 40 minutes.
Serves 6
INGREDIENTS
Cooking spray
1 ¼ lb ground beef
2 tsp ancho chile powder, divided
2 tsp cumin, divided
Salt and freshly ground black pepper to taste
2 ½ cups instant brown rice (see note above)
15 oz can petite diced tomatoe
15 oz can tomato sauce
2 cups water
8.75 oz can sweet corn, drained
4.5 oz can chopped green chiles
5 scallion tops, sliced
1 packed cup (4 oz) grated colby jack or cheddar cheese
Chopped fresh cilantro for garnish
INSTRUCTIONS
1. Heat a large saute pan or skillet with a lid on medium-high heat. Coat with cooking spray and add beef, 1 tsp of the chile powder, and 1 tsp of the cumin; season with salt and pepper. Cook, crumbling the meat with your spoon, until no longer pink, 6 to 7 minutes. Transfer to a paper towel-lined plate to drain.
2. Add rice to the skillet and stir well to coat with the juices from the meat. Add tomatoes, tomato sauce and water. Cover and bring to a simmer; reduce heat to medium low. Cook, stirring occasionally, until rice is tender, 20 to 25 minutes (The directions on the rice box don't apply; it takes a bit longer to cook with this method.).
3. Stir in corn, green chiles, scallions, beef, and remaining 1 tsp each of chile powder and cumin. Taste for seasoning and add salt and pepper if needed. Sprinkle cheese all over the top. Cover the pan and reduce heat to low. Cook until cheese is melted, 3 to 5 minutes. Rest 5 minutes, sprinkle with cilantro and serve.

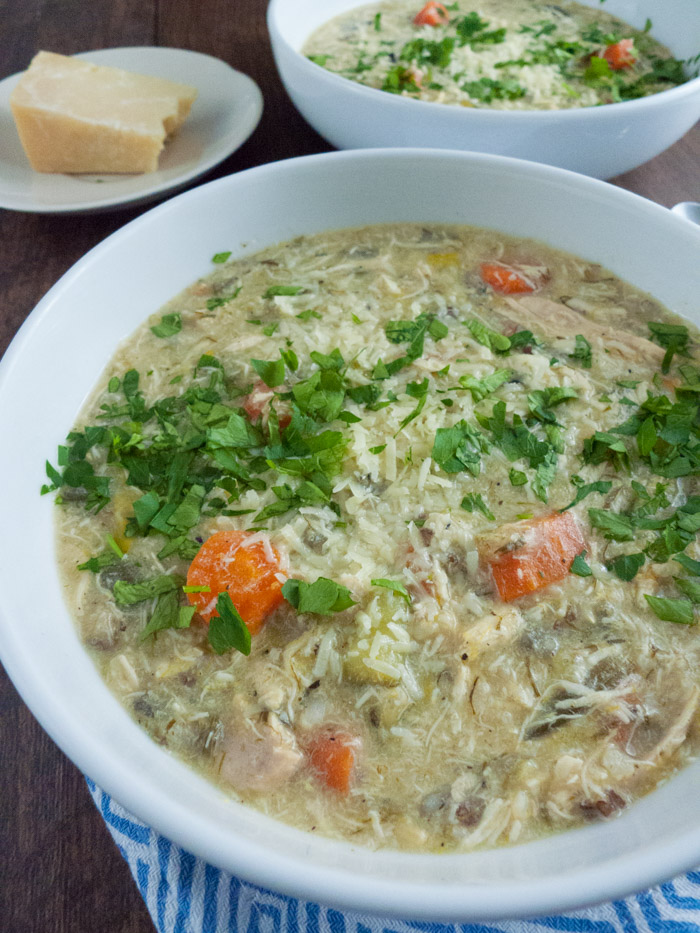
This slow cooker soup is so rich and creamy that it's more of a chowder than a soup. I've eaten it 3 times this week, and I'm sad to run out! I'm so in love with it that I put together a whole week's worth of low-FODMAP meals around it.
More on that in a second, but if you want to just grab the free 1-week dinner menu right now, click the button!
This soup is packed with moist, shredded chicken, veggies and wild rice. To keep the leeks from getting so soft that they melt away, I saute them in a little garlic oil and add them at the very end so they retain their texture and bright oniony flavor.
But the thing that really sets this recipe apart is a very simple secret ingredien
To get that thick, creamy texture with zero dairy, I stir two egg yolks into the soup. Not only do they thicken, but they add an extra hit of satisfying protein and healthy fat that makes this a meal in a bowl (but don't let that stop you from having a nice green salad on the side!). They don't taste "eggy" either, just rich and delicious.
The soup recipe is below, but I also put it into a 1-week menu of low-FODMAP dinners for you to download!
So often, when websites offer free meal plans and menus, they just give you 7 totally different recipes as if you have an hour or two to spend cooking every night of the week (and unlimited money to spend on ingredients). I know you don't have that kind of time because you've told me.
So this menu features four main dinner recipes with instructions on how to repurpose the leftovers or ideas for different side dishes to jazz them up on day two.
To get the menu delivered straight to your inbox, just click the yellow button and let me know where to send it!
You'll also be added to the Calm Belly Email Crew, which means every Friday you'll get even more tips, inspiration and bonuses that you won't find on the blog.
So what do you think of this recipe? Have you ever used egg yolks as a thickener before? I'm absolutely loving my slow cooker right now, so if you have a favorite recipe to share, leave a link in the comments!
If you liked this post, would you take a second to share it on Pinterest or Facebook? Thank you...I'm giving you a big computer hug right now!
Low-FODMAP, Gluten Free (if made with low-FODMAP, GF broth)
Although I say adding egg yolks is optional, it's a great technique that makes this soup extra special. Stirring them in at the end creates a rich, creamy texture without tasting “eggy.” Since veggies tend to get a little too soft in the slow cooker, I like adding the sautéed leeks at the very end so they retain their bite and pack more onion-like flavor. However, if you want to add them at the beginning, sautéed or not, the soup will still be fantastic. Herbes de Provence is a blend of dried herbs, usually thyme, rosemary, marjoram and lavender; find it in the spice section. Dried thyme may be substituted.
Author: Julie-Calm Belly Kitchen Recipe type: Main dish
Prep time: 10 mins Cook time: 4 to 8 hours, 30 mins Total time: 4 to 8 hours, 40 mins
Serves 4 to 5
INGREDIENTS
4 carrots, peeled and chopped
1 large zucchini, chopped
1 lb boneless, skinless chicken breasts, cut in half if large
1 tbsp butter
1/2 teaspoon dried herbes de Provence or dried thyme
1 bay leaf
4 cups chicken broth
1 cup water
3/4 cup wild rice-brown rice blend (I use Lundberg)
2 egg yolks (optional)
2 tsp garlic-infused or regular olive oil
1 small leek, green parts only, sliced
3 tbsp lemon juice (from 1 lemon)
Salt and black pepper to taste
Grated parmesan cheese for serving
Chopped fresh Italian parsley for serving
INSTRUCTIONS
1. Add all ingredients through rice to a large slow cooker and cook until chicken breasts are opaque in the thickest part (165F on an instant-read thermometer) and rice is tender, 4 hours on high, or 8 hours on low. Transfer chicken breasts to a cutting board.
2. In a small bowl, whisk the egg yolks. Slowly pour about ¼ cup of the hot soup into the yolks as you whisk (this heats up the yolks so they don't start to scramble when you add them to the hot soup). With the slow cooker on high, slowly pour the yolk mixture into the soup, stirring as you pour. Cover the slow cooker and cook on high for 10 minutes.
3. Heat the garlic oil in a skillet on medium heat. Add leek, season with salt and pepper, and cook until tender, 6 to 8 minutes. Shred the chicken and add it back to the slow cooker along with the leeks. Cover and cook for a few minutes, just until chicken is heated through. If soup is very thick, add water or broth (I added about ½ cup) to thin as you like. Turn off slow cooker and stir in the lemon juice. Season to taste with salt and black pepper. Ladle into bowls and top with Parmesan and fresh parsley.