vegetables

Ancho-Orange Roast Chicken and Spaghetti Squash (low FODMAP recipe)

Ancho-Orange Roast Chicken and Spaghetti Squash (low FODMAP recipe)

Sweet, smoky ancho chile powder and orange zest give this chicken a pop of flavor. It's low FODMAP and perfect with roasted spaghetti squash topped with goat cheese. The perfect spiced-up twist on your classic roast chicken! #fodmap #IBS

Share on Pinterest (It helps more people find CBK!)

Ancho chile powder is easily the most-used spice in my kitchen, so of course I had to include it in the Low-FODMAP Spices Series.

First let’s clear something up real quick: Ancho chile powder is made from dried and ground ancho chiles, nothing else. The same goes for chipotle chile powder or ground cayenne. 

On the other hand, when you see a spice labelled “chili powder” or chili seasoning, it’s usually a blend of many ingredients like cayenne, paprika, pepper, salt, AND ground onion and garlic powders. Since you’re aiming to avoid onion and garlic in the FODMAP elimination phase, chili powders like this are a no-go.

Instead, look for those pure ground chile powders like ancho. The big spice brands like McCormick sell it, so it’s easy to find in large supermarkets these days. If you want to buy it online (along with just about any spice), check out The Spice House.

Catch up on other recipes in the Low-FODMAP Spices Series:

Grilled Chicken with Curry-Lime Marinade

Maple-Soy Chicken Drumsticks with 5 Spice

Easy Coconut-Shrimp Curry with Chickpeas

What does ancho chile powder taste like and how do you use it?

Ancho chile powder is mild, so if you don’t like a lot of heat in your food this is the one for you. The flavor is slightly sweet and smoky. When you open a jar of fresh ancho chile powder, you’ll notice the scent of dried fruit.

You can use ancho chile powder in Mexican dishes - It’s great paired with cumin, paprika, or coriander. It’s also great as an all-purpose flavor booster for just about any protein.

But I especially like using it in unexpected ways, like in an Italian meat sauce. It won’t make your bolognese taste like Mexican; instead it adds an extra dimension of flavor with its sweet smokiness.

More Ways To Use Ancho Chile Powder:

  • Use it alone to season pork, chicken, salmon or shrimp
  • Make it the main ingredient in a rub for roasted or smoked pork (I like to include cumin, thyme, coriander, coffee, and brown sugar) 
  • Pair it with cumin to season ground meat for tacos or any Latin dish
  • Use it to add flavor and depth to Italian meat sauces, meatballs, or any tomato-based sauce
  • Use it to season roasted winter acorn squash - the sweetness of the squash is a great match for ancho chile
  • Sprinkle it on potatoes when you make baked french fries to add flavor and color
  • Pair it with paprika to season grilled chicken

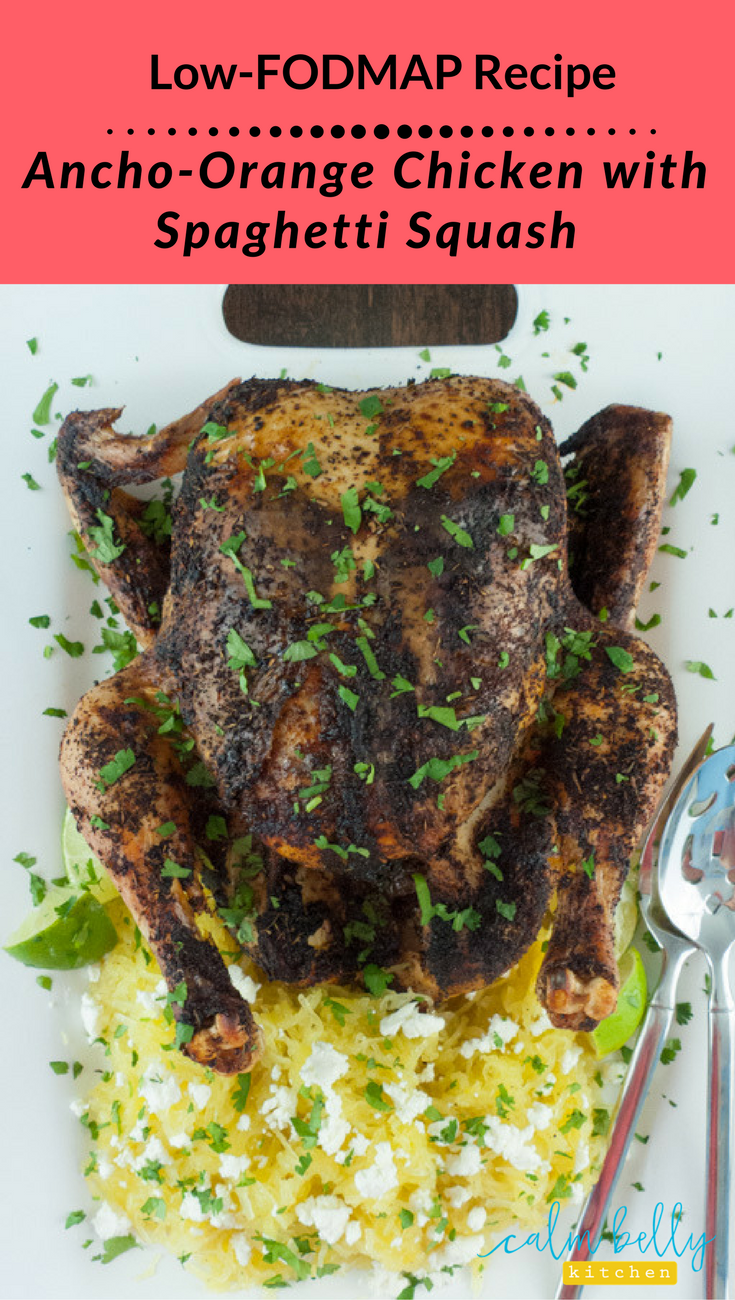
Ancho-Orange Roast Chicken and Spaghetti Squash (low FODMAP)

While the chicken rests, you can use those pan juices! Transfer them to a fat separator or a bowl and remove as much fat as possible - you now have homemade broth. Use the juices as a sauce for the roast chicken or later in another dish. If you have time, allow the chicken to come to room temperature for 30 to 45 minutes before cooking - this reduces the roasting time. 

Serves 4 (spaghetti squash yields 38-42 oz. cooked)

INGREDIENTS

1 tbsp ancho chile powder
1 tsp dried thyme
1 navel orange, zested
5 to 6 lb chicken
Cooking spray or oil
Salt and freshly ground black pepper
2 ¼ to 2 ½ lb spaghetti squash
1 tbsp extra virgin olive oil
2 oz goat cheese, crumbled
Lime wedges for serving
Chopped fresh cilantro for garnish

INSTRUCTIONS

1. Preheat oven to 425F and arrange oven racks in upper and lower thirds of the oven. In a small bowl, combine ancho chile powder, thyme and the orange zest. Rinse chicken and remove giblets and any excess fat; pat dry with paper towel. Place chicken on a rack inside a large roasting pan. Coat with cooking spray or oil and season generously with salt and pepper, inside and out. 

2. Gently lift the skin covering the breasts near the cavity end of the chicken and push a generous amount of the ancho mixture under the skin, seasoning the breast meat. Rub remaining ancho mixture all over the top and sides of the chicken. Place half the orange inside the cavity, and tuck the wing tips under the body of the chicken. Add a thin layer of water (about ¼-inch) to the roasting pan and place on the lower rack of the oven. 

3. Roast for 1 hour 30 minutes to 2 hours (see note). After about 1 hour, cover the top of the chicken loosely with large piece of foil to prevent over browning. Chicken is done when internal temp reaches 165F on an instant read thermometer, testing chicken in the center of the breast and thickest part of the thigh, not touching the bone. Rest 10 minutes.

4. As soon as you get the chicken in the oven, prep the spaghetti squash: Trim the stem end, then cut in half lengthwise. Line a large rimmed baking sheet with foil (optional, but minimizes cleanup) and mist with cooking spray or oil and place squash on baking sheet cut-side-down. Roast in upper third of the oven until flesh is very tender when pierced with a fork, 40 to 45 minutes. 

5. Transfer squash to a cutting board, cut-side-up to cool. When cool enough to handle, scoop out the layer of seeds and slimy bits of squash. Then with a fork, lightly scrape the squash out of the skin in spaghetti-like strands and transfer to a medium bowl. Add extra virgin olive oil, season with salt and pepper and stir gently to combine. Transfer to serving platter and sprinkle with goat cheese. Serve with chicken and lime wedges, and garnish the whole thing with fresh cilantro.

Caprese Salad with Grilled Eggplant (low-FODMAP recipe)

Caprese Salad with Grilled Eggplant (low-FODMAP recipe)

Grilling is the perfect cooking method for low fodmap recipes because it adds a ton of flavor. I took a classic Italian tomato and mozzarella salad and added slices of eggplant with a char straight from the grill. It's simple, fast, and delicious.

Pin it!

During summer, I want easy recipes using the fresh produce that isn’t around come January in Chicago. I also want to grill as much as possible.

If you agree, you’ll love this recipe! “Easy” is really an understatement. Make this dish once and you’ll have it memorized forever. :-)

It’s a caprese salad, the classic Italian salad with colors meant to resemble the Italian flag, with the tasty addition of grilled eggplant. The eggplant makes this a more substantial side or appetizer, or even a light meatless meal.

When you have IBS, large servings of vegetables can be hard to digest, but caprese gives you that salad experience without a big bowl of lettuce and raw veggies. If you’re sensitive to vegetables, start with a small serving and see how you feel!

Looking for more low-FODMAP grilling recipes? Check out Lemon-Caper Fish and Veggies Grilled in Foil Packets or the Grilled Steak with Chimichurri Sauce!

Caprese Salad with Grilled Eggplant

This salad works best with flavorful tomatoes in season - If you grow them or have access to a farmer’s market, that’s the way to go! I used heirlooms, but common varieties are great too. Pair with sourdough bread or another grain for a light meatless meal. You could also add prosciutto or chicken to the salad for extra protein.

Serves 4

INGREDIENTS

1 medium eggplant, sliced in rounds about ¼-inch thick
Cooking spray or oil
Salt and freshly ground black pepper to taste
6 ounces fresh mozzarella, sliced thin
2 medium (7 to 8 ounces each) tomatoes (see note above), cut into wedges
Sea salt to taste
4 tsp extra virgin olive oil
4 tsp balsamic vinegar
Chopped fresh basil

INSTRUCTIONS

1. Prepare a charcoal or gas grill (medium-high for gas). Coat both sides of eggplant rounds with cooking spray (or brush with oil) and season with salt and pepper. Grill until very tender, 16 to 20 minutes, turning 3 to 4 times during cooking.

2. Arrange 3 eggplant slices (you may have some leftover) on each of four plates. Top evenly with mozzarella and tomatoes. Drizzle each plate with 1 tsp each extra-virgin olive oil and balsamic vinegar. Season tomatoes with sea salt. Garnish with basil and serve.

Tip: Want to make sure your fresh mozzarella is low lactose? Look at the “Sugars” line on the Nutrition Facts label. Lactose shows up as sugar in dairy products, so if it says “0 g” you know it’s low-FODMAP. This works for any cheese, as long as there are no added sugars in the ingredient list (honey, for example), which there shouldn’t be unless it’s a flavored cheese product.

>>> Need to make food shopping on the FODMAP Diet a little easier? I created a free shopping list of everyday food you can find at most supermarkets (plus links to some of my favorite low-FODMAP recipes!). Click to grab it!

Vegan Nut & Veggie Tart with Green Herb Sauce (Low-FODMAP, Gluten Free, Dairy Free)

Vegan Nut & Veggie Tart with Green Herb Sauce (Low-FODMAP, Gluten Free, Dairy Free)

If you are vegan or plan to cook for vegans or vegetarians, this meatless main dish is perfect for a crowd! It makes a beautiful holiday main course, and it can be made ahead of time. It's full of delicious winter vegetables, plus rice, lentils and …

Ah, holiday cooking. So many dietary needs to take care of. Enter the vegan tart. This recipe is for you if…

  • You're a vegan or vegetarian.

  • You're cooking for vegans or vegetarians sometime soon.

  • You want a crazy-nutritious meatless main dish for the holidays.

But let me backtrack for a second. This recipe came about through an informal collaboration with Alana, the very talented writer behind the blog, A Little Bit Yummy.

She had a lot of readers asking for a vegan nut loaf recipe to make for the holidays. However, being allergic to nuts, she asked if I'd be interested in developing the recipe.

My answer: Heck, yes!

Through the past 9 years of doing freelance recipe development, some of my favorite jobs have been the ones that are different from my personal eating style. Stretching that creative muscle is always a good idea: It's both fun and mentally engaging!

Let's get into the details...

Here's what the ingredients look like before stirring in the nuts and right before going in the oven. Everything stays super-moist, without any crumbling.

Here's why I think this is the vegan recipe you need to try this season:

It won't weigh you down. Some vegan nut loaves have the heft of a hockey puck and come in at 1,000 calories per serving (it happens!). Not this tart. Instead of mostly nuts, this recipe consists of brown rice, lentils and a bunch of winter veggies. It will make your kitchen smell like Thanksgiving.

The sauce. The sauce alone is a gem. With the creaminess of avocado and a tangy hit of lemon, you'll want to eat it straight. Double the recipe if you want; whip it up anytime you've got extra herbs on hand; put it on everything!

It's not a loaf, it's a tart! If you've never found the look of traditional vegan nut loaves all that enticing, this pretty tart is the answer.

No advanced cooking skills. There are quite a few steps to get all the components together, but they're easy-peasy. Plus, you can do some or all of it ahead if you want.

Freedom of choice. If you really want to make a loaf, this recipe should fit in 2 standard loaf pans. But there are other fun possibilities: Use a muffin tin to make individual servings for a potluck or buffet. Use mini muffin tins to make appetizers (cute!)--just be sure to decrease the baking time. I love baking in my cast iron skillet because it looks great at the table, but a pie plate or similar-sized baking dish will work too.

So are you convinced? I'd love to know how many of you follow a vegan or vegetarian diet. Do want to see more recipes like this? Will you give this one a try? Let me know below in the comments!

If you are vegan or plan to cook for vegans or vegetarians, this meatless main dish is perfect for a crowd! It makes a beautiful holiday main course, and it can be made ahead of time. It's full of delicious winter vegetables, plus rice, lentils and …

Vegan Nut and Veggie Tart with Green Herb Sauce (Low-FODMAP, Gluten Free, Dairy Free)

A cast iron skillet is great for baking this rustic tart, but any oven-safe 9-inch pan will work, as well as any similar-size baking dish, such as a pie plate. If you use a baking dish, I recommend greasing it with butter or ghee as noted in the recipe. The easiest way to shred the carrot and parsnip is with a food processor with a shredding disk. If you don't have this attachment, you can grate them on a box grater or cut into very thin strips (julienne) with a knife.

Author: Julie-Calm Belly Kitchen             Recipe type: Entrée
Prep time: 50 mins        Cook time: 25 mins        Total time: 1 hour, 15 mins
Makes 8 servings


INGREDIENTS

For Tart:
2 tbsp olive oil, divided
3/4 cup (84g) walnuts
3/4 cup (84g) pecans
1 medium carrot, peeled and shredded (about 1 cup/85 g shredded; see note above) 
1 medium parsnip, peeled and shredded (about 1 cup/85 g shredded; see note above) 
½ tsp dried rosemary
½ tsp dried thyme
Salt and freshly ground black pepper to taste
1 medium leek, green part only, chopped (about 1 cup)
1 rib celery, diced (about 2/3 cup)
¾ cup (105 g) cooked brown rice
2/3 cup (92g) rinsed and drained canned lentils
3 small slices (75g) low-FODMAP, gluten-free bread
1 cup unsweetened almond milk
1 tbsp chia seeds
Nonstick cooking spray, butter or ghee for greasing your pan (see note above)

For sauce:
1 cup (packed) mixed parsley and cilantro (leaves and thin stems)
¼ avocado, chopped
2 tbsp lemon juice (from 1 lemon)
1 tsp Dijon mustard
1 tsp hot sauce (optional)
3 tbsp extra virgin olive oil
¼ to ½ cup water
Salt and freshly ground black pepper to taste


INSTRUCTIONS

1. Preheat oven to 350F. Spread walnuts and pecans on a large, rimmed baking sheet and bake until fragrant and light golden brown, 7 to 8 minutes, stirring them around about halfway through. Transfer to a plate and set aside until completely cool (I like to do this a day or two ahead of time). When cool (otherwise they can turn into a paste), finely chop in a food processor fitted with the metal blade.

2. If the shredded carrots or parsnips are very long, roughly chop so pieces are no longer than 1 inch. Heat 1 tbsp of the oil in a large skillet (if you'll be baking the tart in a 9-inch oven-safe skillet, you can use that) on medium. Add the carrot, parsnip, rosemary, thyme, and salt and black pepper to taste. Cook, stirring frequently, until tender and lightly browned, 5 to 7 minutes. Transfer to a large bowl.

3. Add remaining 1 tbsp of the oil to the same skillet and heat on medium. Add leek, celery and salt and pepper to taste. Cook, stirring frequently, until tender and light golden brown, 6 to 8 minutes. Add to bowl with carrot mixture. Add the rice, lentils and chopped nuts and stir until combined.

4. Place the bread in a shallow bowl or small baking dish in a single layer. Add the almond milk and allow the bread to soak until very soft but not dissolving, about 5 minutes, turning once. Tear into small ½-inch pieces and add to bowl with veggie mixture (discard remaining almond milk). Stir until combined.

5. In a small bowl, stir together the chia seeds and 3 tbsp warm water. Set aside until mixture thickens to a gel-like consistency, about 5 minutes. Add to bowl with veggie mixture and stir until combined. Taste for seasoning and add extra salt, pepper or herbs (or other spices) as desired. Coat a 9-inch oven-safe skillet (such as cast iron or stainless steel) with nonstick cooking spray; or coat a 9-inch pie plate or similar-size baking dish with butter or ghee. Add veggie mixture and pat into an even layer. Bake at 350F until slightly puffed in the center and lightly browned at the edges, 25 to 30 minutes. 

6. Make the sauce: In a food processor fitted with the metal blade, combine herbs, avocado, lemon juice, mustard and hot sauce if using. Pulse until herbs are chopped, scraping down the bowl as needed. With processor running, slowly pour the olive oil in through the feed tube, followed by ¼ cup of the water. Scrape down the sides of the bowl. Add more water as needed until the sauce is thick but pourable (you should be able to drizzle it off a spoon). Season to taste with salt and pepper.

7. When tart is done baking, cool for 10 to 15 minutes. Cut into slices and drizzle with the sauce to serve. Tart may be made up to 2 days ahead. Cover and refrigerate. To reheat, cover with foil and bake at 275F until heated through, about 20 minutes; or transfer to a microwave-safe plate and microwave on medium power for about 2 minutes or until center is hot. For the most vibrant color, it's best to make the sauce just before serving.


Nutrition Information
Serving size: 1/8 of recipe (including sauce)  Calories: 360  Fat: 26 g Saturated fat: 3 g Carbohydrates: 29 g Sugar: 3  g Sodium: 108 mg Fiber: 6 g Protein: 8 g

Easy One-Pan Ratatouille (low-FODMAP recipe)

Easy One-Pan Ratatouille Low-FODMAP gluten free

For years I followed the "rules" of healthy eating. For example...

  • Eat whole wheat bread and pasta to get fiber and nutrients

  • Fill half your plate with vegetables

  • Have oatmeal for breakfast to feel fuller longer

  • Have 3 balanced meals and 2 snacks

  • Eat fruit for dessert

  • Get plenty of calcium from dairy products

The list could go on. I was following most of these rules year in and year out wondering why my stomach felt terrible so often.

I was doing everything right, so what the heck was wrong with me?

If you went through the same thing before learning about FODMAPs, you probably see where I'm going with this. The low-FODMAP diet helps people like us manage our digestive symptoms. And it does this by going against conventional healthy eating wisdom more often than not.

Lesson: Sometimes you have to break the rules to get remarkable results.

And that is exactly how I developed this easy, one-pan ratatouille recipe. Traditional ratatouille may be a simple, homey dish (which you know if you've seen the Pixar movie), but here's what that cute little animated rat doesn't tell you: It's actually a time-consuming and "involved" sort of recipe.

Easy One-Pan Ratatouille Low-FODMAP gluten free

The individual ingredients are usually cooked separately (and slowly), often in multiple pots, and in the oven too. Some recipes tell you to salt the eggplant (totally unnecessary!), peel tomatoes and make a fresh sauce, let the finished ratatouille rest... It's a little out of control.

I wanted super-tender, flavorful veggies and a thick sauce.

So I decided to take the low-FODMAP veggies I love, quickly brown them and simmer them up with canned tomatoes. Guess what? It totally worked. And it turned out even better than I expected. Don't you love it when that happens?

Yes, this recipe is all veggies (obviously), so stick to a moderate portion. Maybe 1/2 cup to start? If you know any of these veggies disagree with you, add something else or use extra zucchini if you don't like eggplant, for example.

Think of this ratatouille as a magic little side dish-slash-topping that can take pretty much any meal from boring to awesome. And it's oh-so-good the next day and the day after that. Use it to create different meals throughout the week.

For instance, you could...

  • Pair it with any protein (I added sliced grilled chicken)

  • Serve it over polenta

  • Serve it over roasted pork tenderloin

  • Turn it into a topping for simple grilled or sautéed fish

  • Use it as a sauce for gluten-free pasta

  • Add it to steamed quinoa, millet, sorghum or rice for a really great side dish

  • Mix it into a green salad instead of raw veggies

  • Add it to a sandwich or wrap

  • Make it an omelet filling

Easy One-Pan Ratatouille (Low-FODMAP, gluten free)

Traditional ratatouille is usually a time-consuming, multi-step process, but this one is done in one pan on the stovetop (no hot oven--yay!) in about an hour. And it makes a nice, BIG batch. Serve it over polenta, pasta or a grain like quinoa. Add a protein if you want. Make a salad with it the next day. Lots of possibilities with this one! 
Author: Julie~Calm Belly Kitchen             Recipe type: Sides
Prep time: 5 mins        Cook time: 1 hour        Total time: 1 hour, 5 mins
Serves 8 (1 serving=1/2 cup)

INGREDIENTS

3 to 4 tbsp olive oil
1 med eggplant (1 lb), chopped
salt and black pepper to taste
2 small zucchini (12 oz), chopped
1 large red bell pepper (8 oz), chopped
6 oz thin green beans (haricots verts)
2 1/2 cups unsalted diced tomatoes (from can, jar, etc)
3/4 tsp dried herbs (any combo of thyme, tarragon, rosemary, etc)
Red chile flakes or minced fresh red chile (optional)
1/3 cup chopped olives, such as kalamata
4 oz feta cheese, crumbled
Chopped fresh basil

INSTRUCTIONS

1. In a large, wide sauté pan, heat about 1 1/2 tbsp of oil on medium high. Add eggplant, season with salt and black pepper, and cook, stirring freqently, until lightly browned (eggplant will not be soft and cooked through at this point), 7 to 10 minutes. Transfer to a large bowl. If a lot of brown bits are sticking to the pan, add about 1/4 cup water (or red wine). When it starts to simmer, scrape the bottom of the pan with a spatula to deglaze.

2. Heat about 1 1/2 tbsp of oil in the pan, still on medium high heat, and add the zucchini and bell pepper. Season with salt and black pepper and cook until lightly browned, 7 to 10 minutes. Add to bowl with eggplant. Deglaze pan again if you like. Add 1 to 2 tsp of oil. Add green beans and cook, stirring frequently, until lightly browned, about 3 minutes.

3. Add tomatoes to pan with green beans and bring to a simmer. Stir in eggplant, zucchini, bell peppers, dried herbs and chile flakes if using. Cover and simmer on medium to medium-low heat until vegetables are very tender and sauce has thickened, 25 to 30 minutes, stirring occasionally. If pan gets too dry before veggies are done add water as needed. Stir in olives. Season to taste with salt and black pepper.

4. Serve ratatouille over polenta, gluten-free pasta or quinoa (or use any of the other ideas in this blog post). Sprinkle with feta and fresh basil. I like to add chicken for protein.

Nutrition Information
Serving size: 1/8 of recipe  Calories: 139 Fat: 9g Saturated fat: 3g Carbohydrates: 12g Sugar:  6g Sodium: 296mg Fiber: 4g Protein: 4g

Guide to Low-FODMAP Summer Vegetables (& how to cook 'em!)

In the last newsletter I sent to my Email Crew, I shared 3 favorite low-FODMAP veggies and fruits that I've been stocking up on at the farmer's market and how I put them to use.

(By the way, have you joined the email crew yet? It's free and you'll get a weekly dose of awesomeness that you won't find on the blog. If that sounds like your cup 'o tea, click here.)

Anyhoo, that got me thinking about ALL the amazing low-FODMAP produce...